Capacitor + Supabase + Social Auth + React

I've been building an application to help with a summer job I've had for a couple years which involves line painting. The app is intended to help painters predict when a field needs to be painted, I decided to take the opportunity to create a solid progressive web app and eventually a native app.
But you're not here to listen to my back story, let's just get our app working with Google Social auth on an iPhone using our mac. This tutorial will get an app running with the following:
- An Ionic web application that uses Google Auth via Supabase
- An iOS app that wraps that Ionic web app using Capacitor
- A super basic auth flow that doesn't require building anything specific for the native app (this comes with limitations illustrated later)
For those of you that may already know what you're doing and just want to see a working example of this application, go check out the repo: https://github.com/Kikketer/wtftzone
Table of Contents
Overall Flow
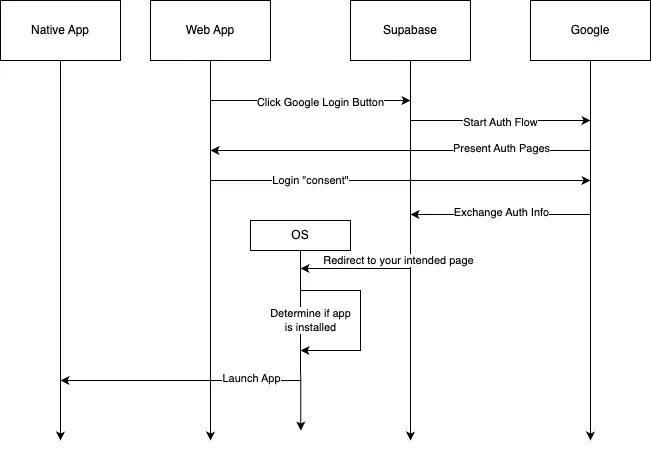
Here's a rough overview of what we are about to do. Supabase acts as the middle-person that allows us to get a Supabase Authentication token using Google. Basically the user is able to authenticate to your Supabase app using their Google auth. The real trick is getting the OS to launch the Capacitor native app vs the web page (using Universal Links).
Baseline Ionic Web Application
Feel free to jump to the Ionic documentation around creating an app, I'll walk through the high level steps but read their docs to really get a more accurate procedure and reasoning behind them: https://ionicframework.com/docs/intro/cli
I hate having libraries install things globally to my system, drives me crazy. So if you want to do as I do, add the node_modules/.bin to your path by editing your `.zshrc` file and put this at the bottom:
export PATH="./node_modules/.bin:$PATH"
Then initialize the application, you can use most any package manager but I tend to like pnpm these days:
pnpm init
This will create the package.json in your application and now you can do the steps described (mostly) in the Ionic setup. First let's install the CLI so we can use their nice app creation wizard:
pnpm i -D @ionic/cliAnd now that we've updated our path we should be able to simply run the CLI commands directly in this folder and it didn't mess with our host system. Follow the steps in the Ionic setup cli, this will create another folder in our current folder but that's ok for now, we will move it:
ionic start1. Use the app creation wizard? No << Don't bother with their online thing
2. React | https://reactjs.org << Pick React (cuz I know that one)
3. Project name: WTF App << App name, whatever you want
4. blank | A blank starter project << Blank to stay simpleUnfortunately it'll also attempt to do the install of node_modules with npm and we also have a nested folder. This side effect is still worth the trouble vs having the cli installed globally. So let's do some cleanup:
rm -rf ./**/node_modules << Wipe out all the node_modules folders for now
mv wtf-app/* . << Moves the nested folder components here (overwrite is fine)
rm -rf wtf-app << Wipe out the empty folder
pnpm i << install the dependencies again
You should now see index.html, package.json etc in this original folder. Phew that was a little crazy but we are in a good spot to move forward now. You should be able to run the following command and see the application running in your browser:
pnpm i -D @ionic/cli << only need to run this the first time to get the CLI back
ionic serve
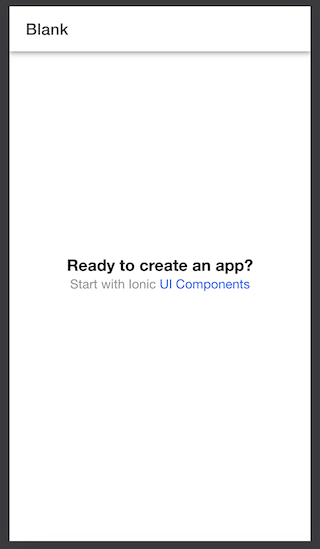
Congrats you have a baseline Ionic app running (same result as the tutorial they provide): https://ionicframework.com/docs/intro/cli
Supabase Auth Setup
We need to setup a simple Supabase application, in this case we are only going to worry about authentication. Once you have that out of the way building the rest of your app can be really easy and fun.
We will be following the tutorial that Supabase provides here: https://supabase.com/docs/guides/auth/social-login/auth-google?queryGroups=platform&platform=web&queryGroups=environment&environment=client
We will be following the "Application Code" path where we are going to provide our own button and logic to handle that button.
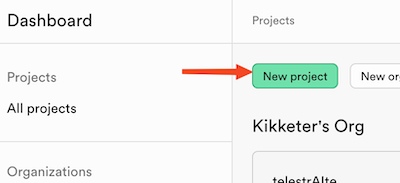
First off we need to create the application within Supabase. Creating an account and project is super easy. After signup (come now I shouldn't have to show you how to do that) you need to create a new project:
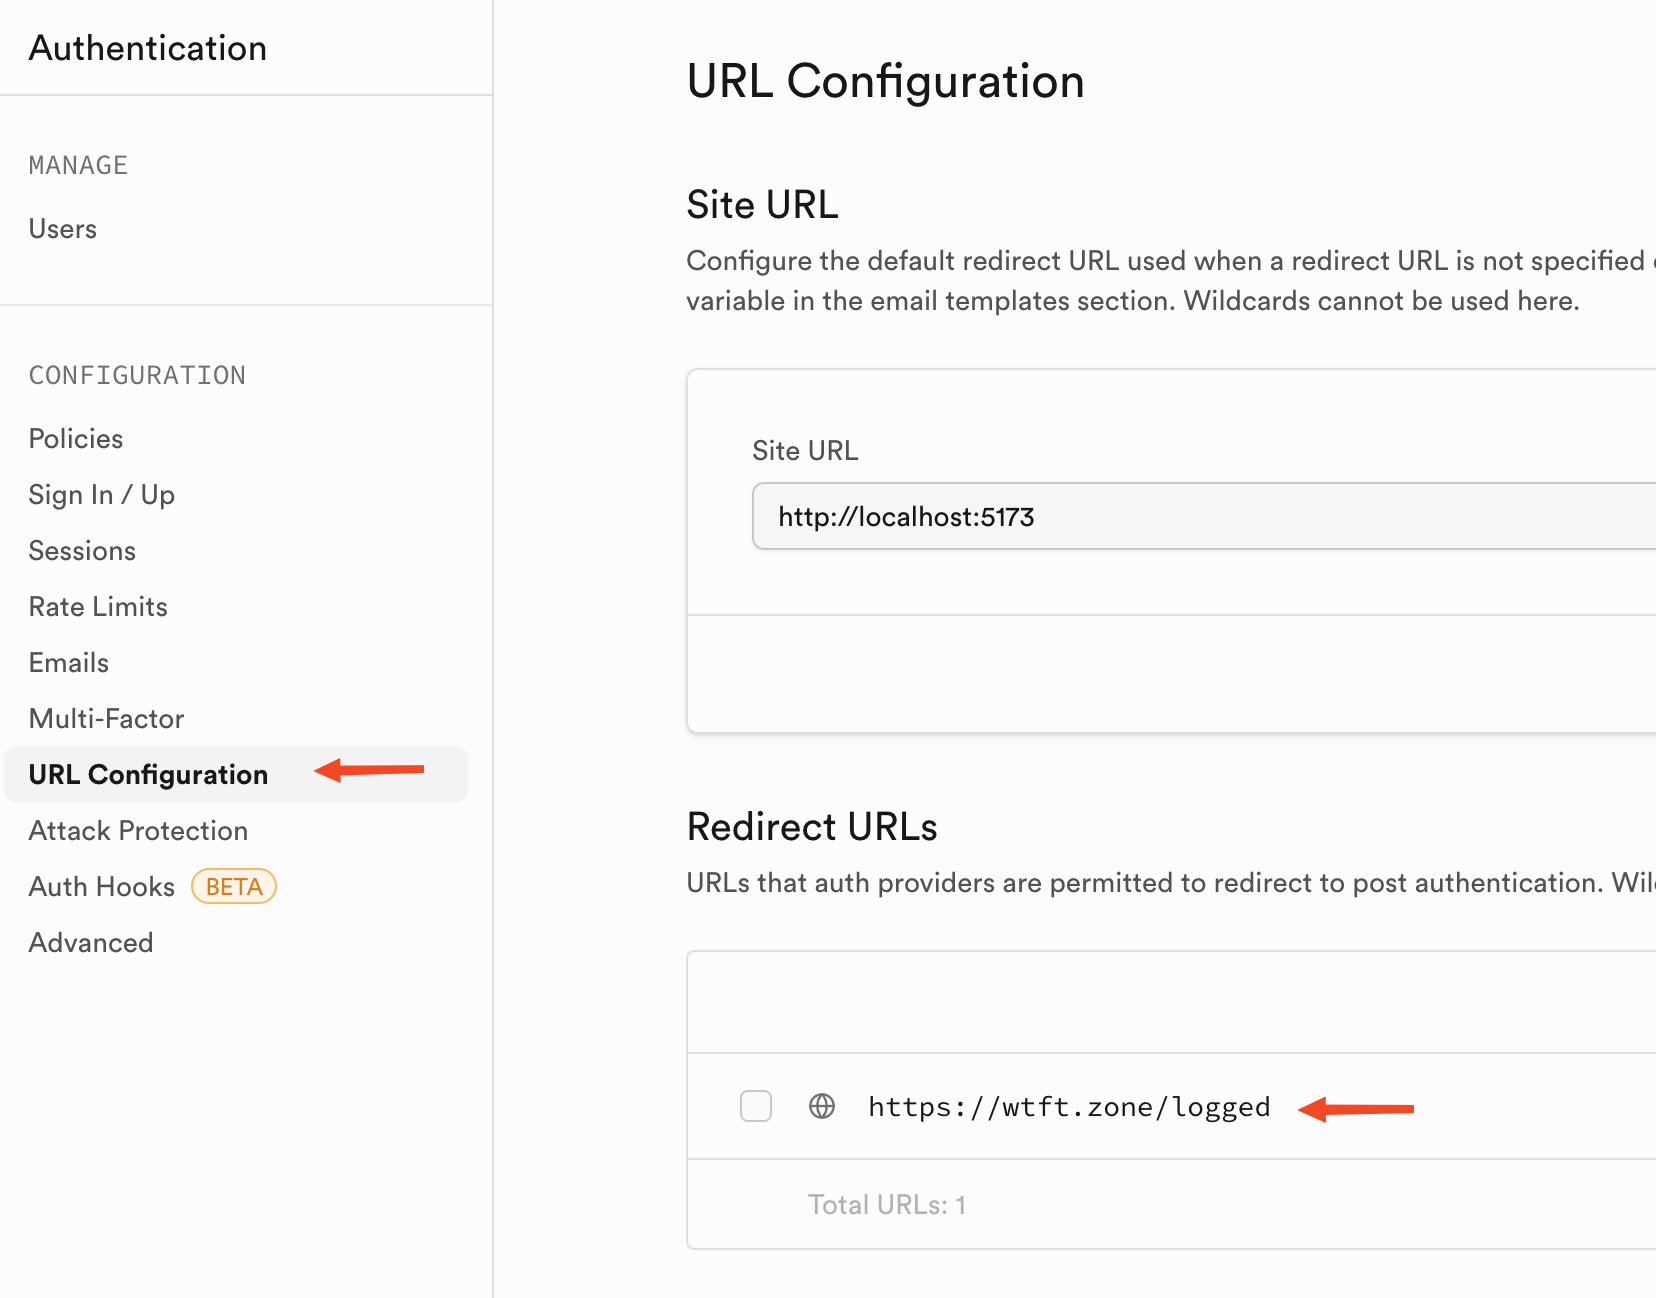
After you create the project we need to go to the Authentication section and setup our website redirect url. This is the url for our app, so for example you might do something like `https://app.isawesome.zone/logged` or the like. I put the `/logged` at the end because that's where we will send users with our authentication information once they sign in.
Now we need to create the application within Google itself! Let's create the project here: https://console.cloud.google.com/projectcreate. Add your project name and move on.
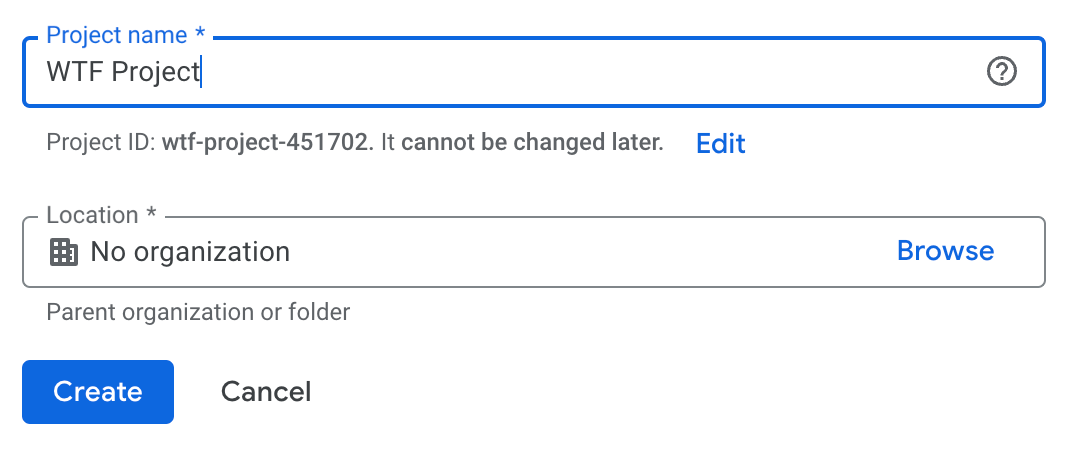
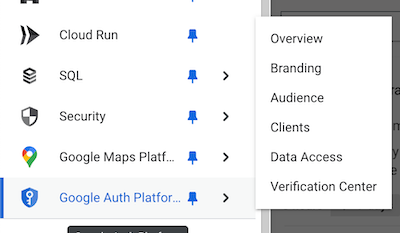
Then we will find the "Auth Platform" in the left side sandwich menu:
Go to the "Clients" page and create a new Web client using your projected web address (we will create the webpage for this later) along with localhost.
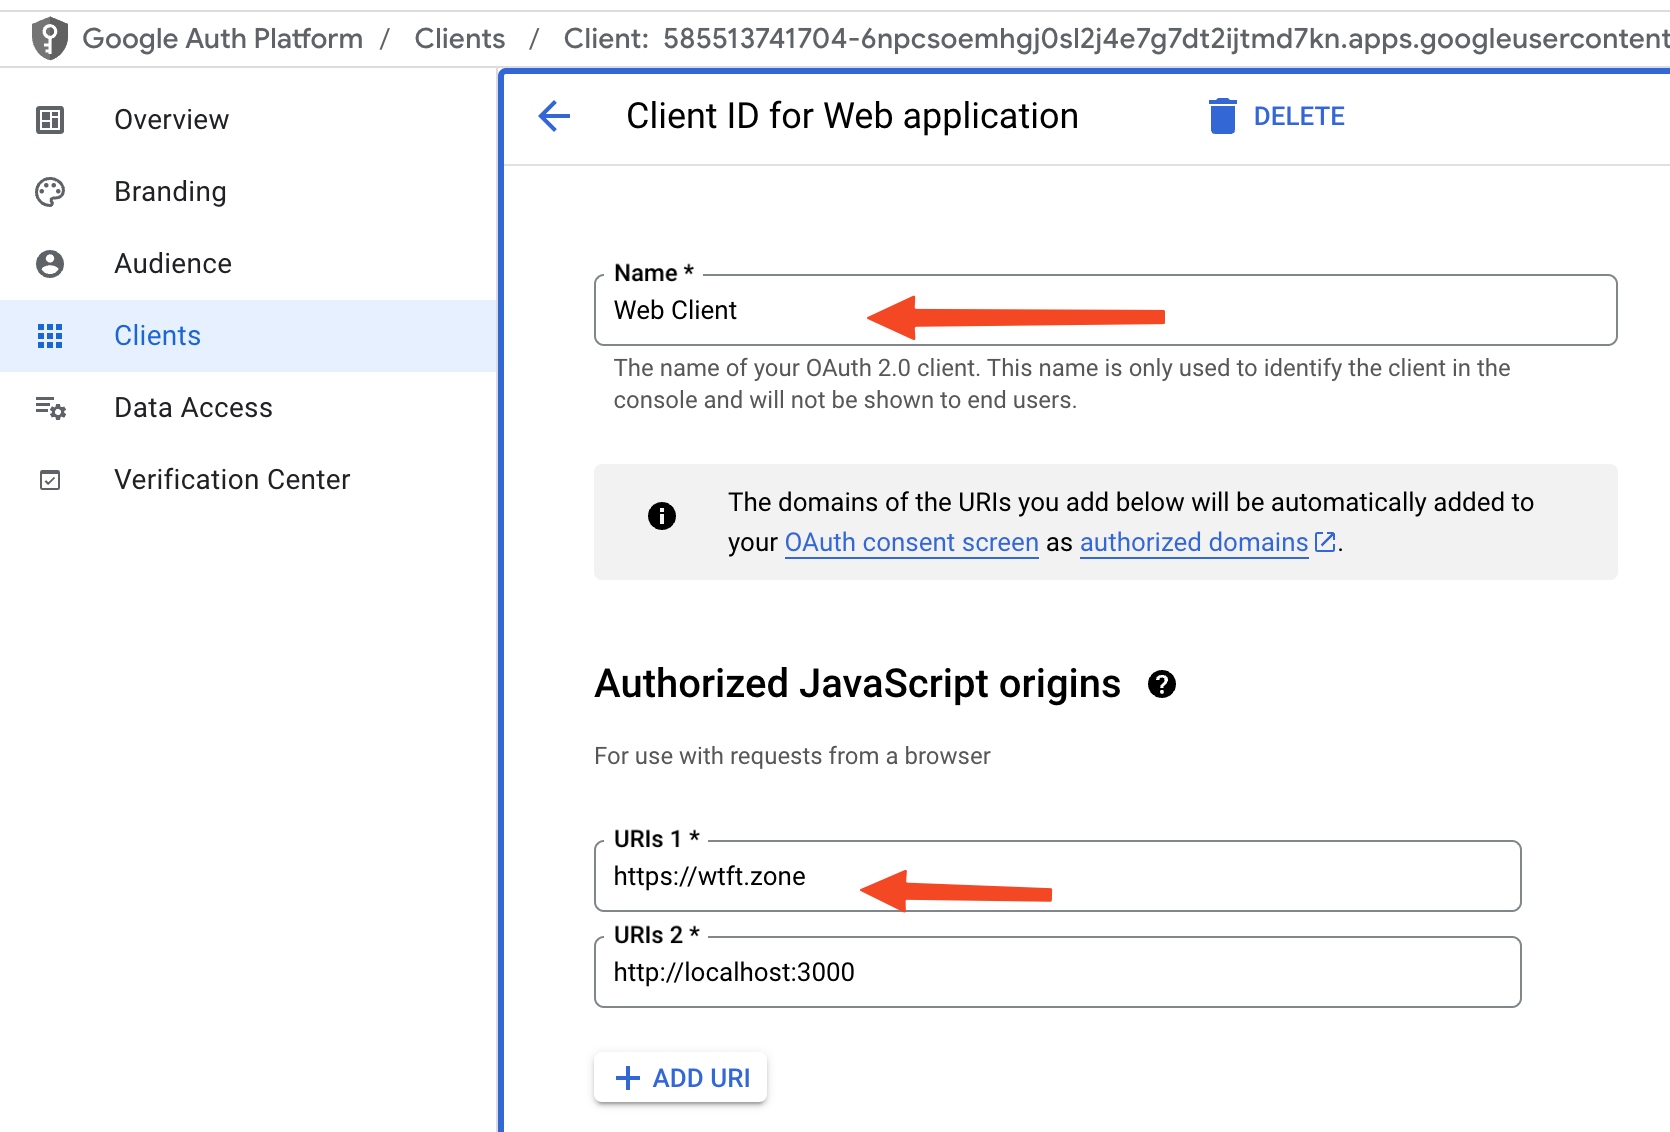
Now once this is setup we will get three things:
- Client ID = public client ID to identify your application
- Client Secret = the secret used for auth
- Callback URL = What Google will call back to with the auth information for a safe exchange of tokens (this domain is handled by Supabase and we tell Supabase to redirect to our own app)
We are going to move that information over into Supabase, click the Sign in/Up link and then click Google:
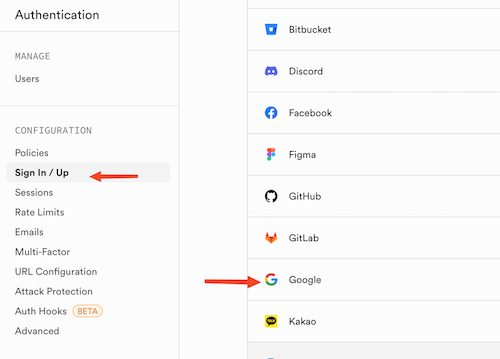
You'll see a fly-out that is asking for the Client ID and Secret. Place the two from the Google page into here. Then take the callback url that's listed and put that into the Google page (swap information!)
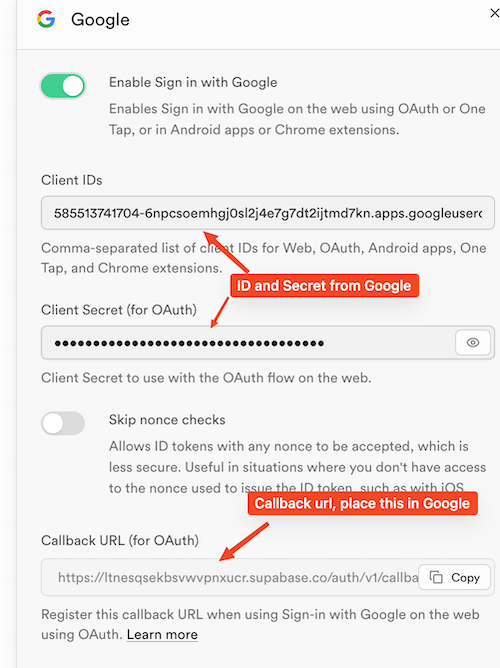
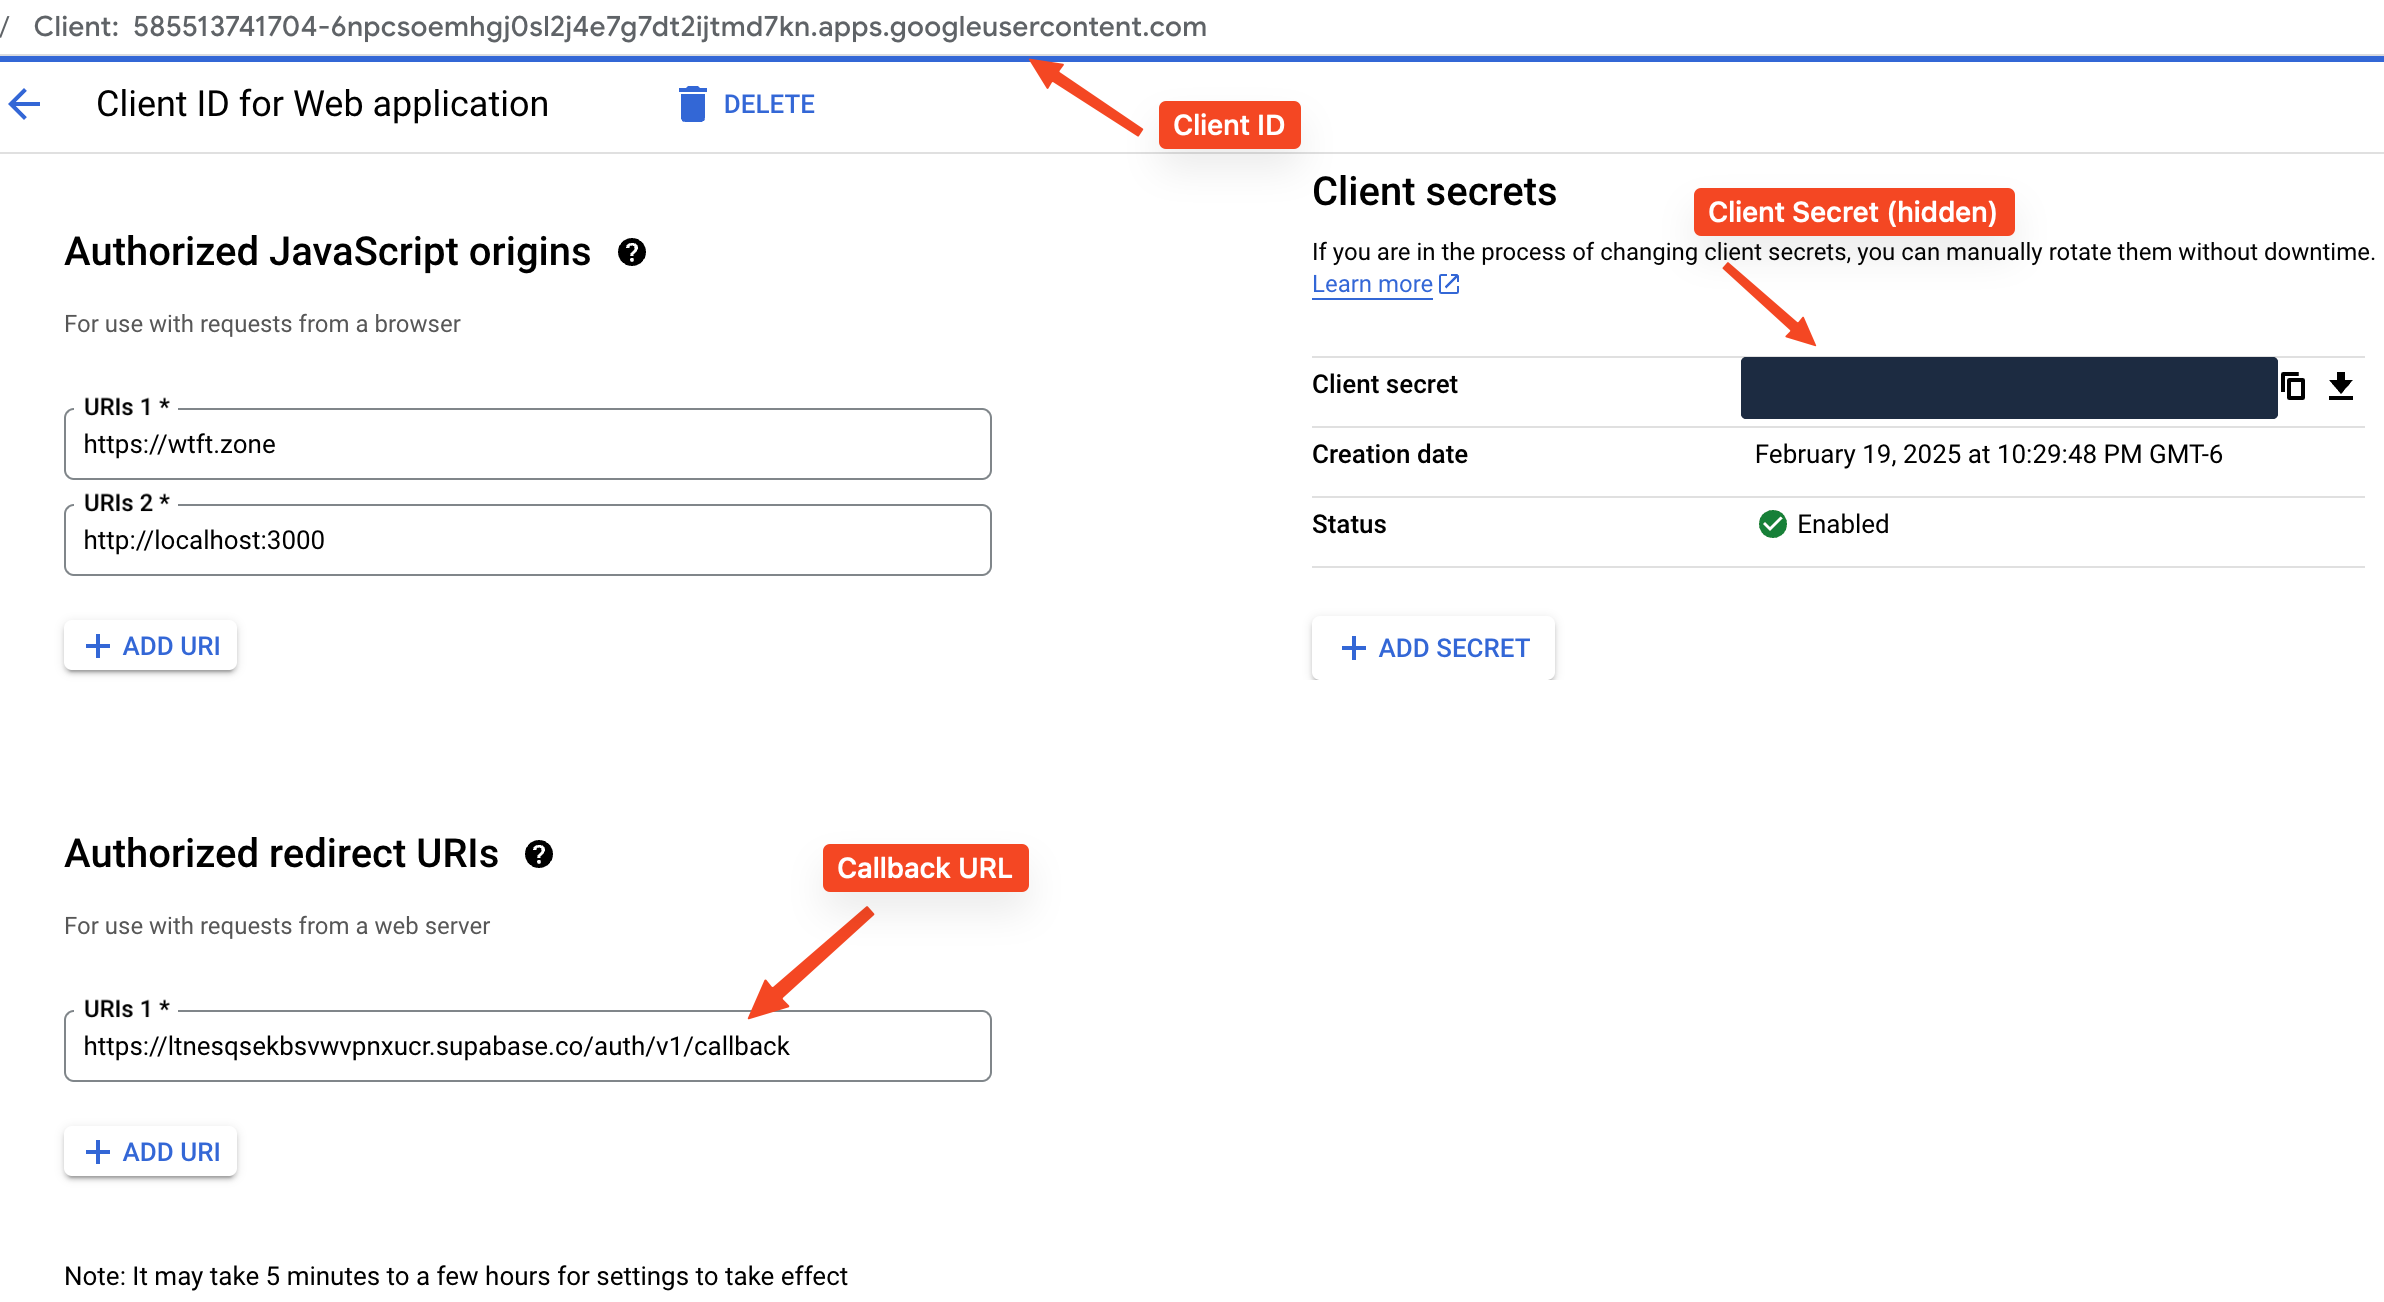
Phew that was a little painful (especially the Google part) but now you have Supabase setup to use Google authentication! Basically you authenticate with Google, and there's a transaction that happens between Supabase and Google to give you a resulting Supabase token which you can then use to query your Supabase databases!
Note however that we do NOT have the ability to use the Google authentication to use Google services. That's a bonus feature I'm going to leave up to you. Be aware that I wasn't able to get that half of it working with the Capacitor app (there are other limitations too).
Adding Sign In With Google Button
Now that we have Supabase auth setup we need to put it into our actual code. Again I'm using the "roll your own" technique vs the "one tap" login. I'm doing this mostly as a design aspect but also as a more universal learning so this could be applied to other social logins like Facebook. We will be somewhat following the basic tutorial steps provided by Supabase: https://supabase.com/docs/guides/auth/social-login/auth-google?queryGroups=platform&platform=web&queryGroups=environment&environment=client#signing-users-in
First let's create a Supabase provider that will handle setting up Supabase and provide the `supabase` functionality to components:
components/SupabaseProvider.tsx
import { createContext, ReactNode, useContext, FC, useState } from 'react'
import { createClient, SupabaseClient } from '@supabase/supabase-js'

const supabaseKey = import.meta.env.VITE_SUPABASE_KEY
const supabaseUrl = import.meta.env.VITE_SUPABASE_URL

const SupabaseContext = createContext<{ supabase: SupabaseClient } | null>(null)

interface SupabaseProviderProps {
  children: ReactNode
}

export const SupabaseProvider: FC<SupabaseProviderProps> = ({
  children,
}) => {
  const [supabase] = useState<SupabaseClient>(() =>
    createClient(supabaseUrl, supabaseKey),
  )

  return (
    <SupabaseContext.Provider value={{ supabase }}>
      {children}
    </SupabaseContext.Provider>
  )
}

export const useSupabase = () => {
  const context = useContext(SupabaseContext)
  if (context === null) {
    throw new Error('useSupabase must be used within a SupabaseProvider')
  }
  return context
}
Notice I provide a hook at the bottom of the file to consume this provider. I like using custom hooks to use providers vs the raw `useContext`, it just makes things clearer and allows us to throw exceptions easily if it's not used properly.
With that let's also create a `<LoginComponent>` that simply has the button and handles the click for that button:
components/LoginComponent.tsx
import { IonButton } from '@ionic/react'
import { useSupabase } from './SupabaseProvider'

const baseUrl = import.meta.env.VITE_BASE_URL

const LoginComponent = () => {
  const { supabase } = useSupabase()

  const login = () => {
    supabase.auth.signInWithOAuth({
      provider: 'google',
      options: {
        redirectTo: `${baseUrl}/logged`,
        queryParams: {
          access_type: 'offline',
          prompt: 'consent',
        },
      },
    })
  }

  return (
    <div id="login">
      <IonButton onClick={login}>Log In with Google</IonButton>
    </div>
  )
}

export default LoginComponent
See how nice that looks with the hook? If we really wanted to get fancy we could/would provide more helper functionality out of the hook/provider such as `signIn` but for now let's keep it simple.
Notice how I also use the `import.meta.env` to get environment variables. These are used to bring the environment variables into a Vite application. When it's built these are injected and can be changed based on what you are building the application for. That's a hint for your potential future if you ever need to do a specific build for Capacitor vs Web (we won't be doing that here).
And now let's use that component in our Home.tsx page:
pages/Home.tsx
import {
  IonContent,
  IonHeader,
  IonPage,
  IonTitle,
  IonToolbar,
} from '@ionic/react'
import LoginComponent from '../components/LoginComponent'
import './Home.css'

const Home: React.FC = () => {
  return (
    <IonPage>
      <IonHeader>
        <IonToolbar>
          <IonTitle>Auth Test</IonTitle>
        </IonToolbar>
      </IonHeader>
      <IonContent fullscreen>
        <IonHeader collapse="condense">
          <IonToolbar>
            <IonTitle size="large">Auth Test</IonTitle>
          </IonToolbar>
        </IonHeader>
        <LoginComponent />
      </IonContent>
    </IonPage>
  )
}

export default Home
This is exactly the same as the stock Ionic Home page except we have brought in the new LoginComponent we just built.
We need one final component: the debug component so we can see that all of this works. Create a new component called DebugComponent.tsx:
components/DebugComponent.tsx
import { useEffect, useState } from 'react'
import { useSupabase } from './SupabaseProvider'
import { User } from '@supabase/supabase-js'

export const DebugComponent = () => {
  const [user, setUser] = useState<User | undefined>()
  const { supabase } = useSupabase()

  useEffect(() => {
    const getUser = async () => {
      const { data, error } = await supabase.auth.getUser()
      if (error) {
        console.log(error)
      } else {
        setUser(data.user)
      }
    }
    getUser()
  }, [supabase])

  return (
    <div id="debug">
      <h2>Debug Info:</h2>
      <p>User</p>
      <pre>{JSON.stringify(user ?? {}, null, 2)}</pre>
    </div>
  )
}
This component is super basic and really just serves the purpose of showing us the logged in user. Similar to the LoginComponent we could have had some of this user logic handled by the useSupabase hook/provider but let's keep it simple and clear again. So far your structure should look similar to this:
/app
  /src
  App.tsx
  main.tsx
    /components
      DebugComponent.tsx
      LoginComponent.tsx
    /pages
      Home.tsx
Let's create a new page called LoggedIn so we can have two routes. Remember when we setup the redirect url we said `/logged` was the page we wished to land on. That's what we will make here:
pages/LoggedIn.tsx
import {
  IonButton,
  IonButtons,
  IonContent,
  IonHeader,
  IonPage,
  IonTitle,
  IonToolbar,
} from '@ionic/react'
import { DebugComponent } from '../components/DebugComponent'
import { useSupabase } from '../components/SupabaseProvider'
import { useHistory } from 'react-router-dom'

export const LoggedIn = () => {
  const history = useHistory()
  const { supabase } = useSupabase()

  const signOut = async () => {
    await supabase.auth.signOut()
    history.push('/')
  }

  return (
    <IonPage>
      <IonHeader>
        <IonToolbar>
          <IonTitle>Logged In</IonTitle>
          <IonButtons slot="end">
            <IonButton onClick={signOut}>Sign Out</IonButton>
          </IonButtons>
        </IonToolbar>
      </IonHeader>
      <IonContent fullscreen>
        <IonHeader collapse="condense">
          <IonToolbar>
            <IonTitle size="large">Logged in</IonTitle>
          </IonToolbar>
        </IonHeader>
        <DebugComponent />
      </IonContent>
    </IonPage>
  )
}
Nothing fancy to this page, we are simply rendering the Sign Out button with an onClick handler but also rendering the Debug component so we can see the authenticated user when we land here.
Now let's setup the routing in App.tsx
pages/App.tsx
import { Redirect, Route } from 'react-router-dom'
import { IonApp, IonRouterOutlet, setupIonicReact } from '@ionic/react'
import { IonReactRouter } from '@ionic/react-router'
import Home from './pages/Home'
import { LoggedIn } from './pages/LoggedIn'
import { SupabaseProvider } from './components/SupabaseProvider'

/* Core CSS required for Ionic components to work properly */
import '@ionic/react/css/core.css'

/* Basic CSS for apps built with Ionic */
import '@ionic/react/css/normalize.css'
import '@ionic/react/css/structure.css'
import '@ionic/react/css/typography.css'

/* Optional CSS utils that can be commented out */
import '@ionic/react/css/padding.css'
import '@ionic/react/css/float-elements.css'
import '@ionic/react/css/text-alignment.css'
import '@ionic/react/css/text-transformation.css'
import '@ionic/react/css/flex-utils.css'
import '@ionic/react/css/display.css'

/**
 * Ionic Dark Mode
 * -----------------------------------------------------
 * For more info, please see:
 * https://ionicframework.com/docs/theming/dark-mode
 */

/* import '@ionic/react/css/palettes/dark.always.css'; */
/* import '@ionic/react/css/palettes/dark.class.css'; */
import '@ionic/react/css/palettes/dark.system.css'

/* Theme variables */
import './theme/variables.css'

setupIonicReact()

const App: React.FC = () => (
  <IonApp>
    <SupabaseProvider>
      <IonReactRouter>
        <IonRouterOutlet>
          <Route exact path="/home">
            <Home />
          </Route>
          <Route exact path="/logged">
            <LoggedIn />
          </Route>
          <Route exact path="/">
            <Redirect to="/home" />
          </Route>
        </IonRouterOutlet>
      </IonReactRouter>
    </SupabaseProvider>
  </IonApp>
)

export default App
This is mostly the stock App.tsx page that Ionic built for us but with the new Logged page. Feel free to style it up a little bit if you'd like.
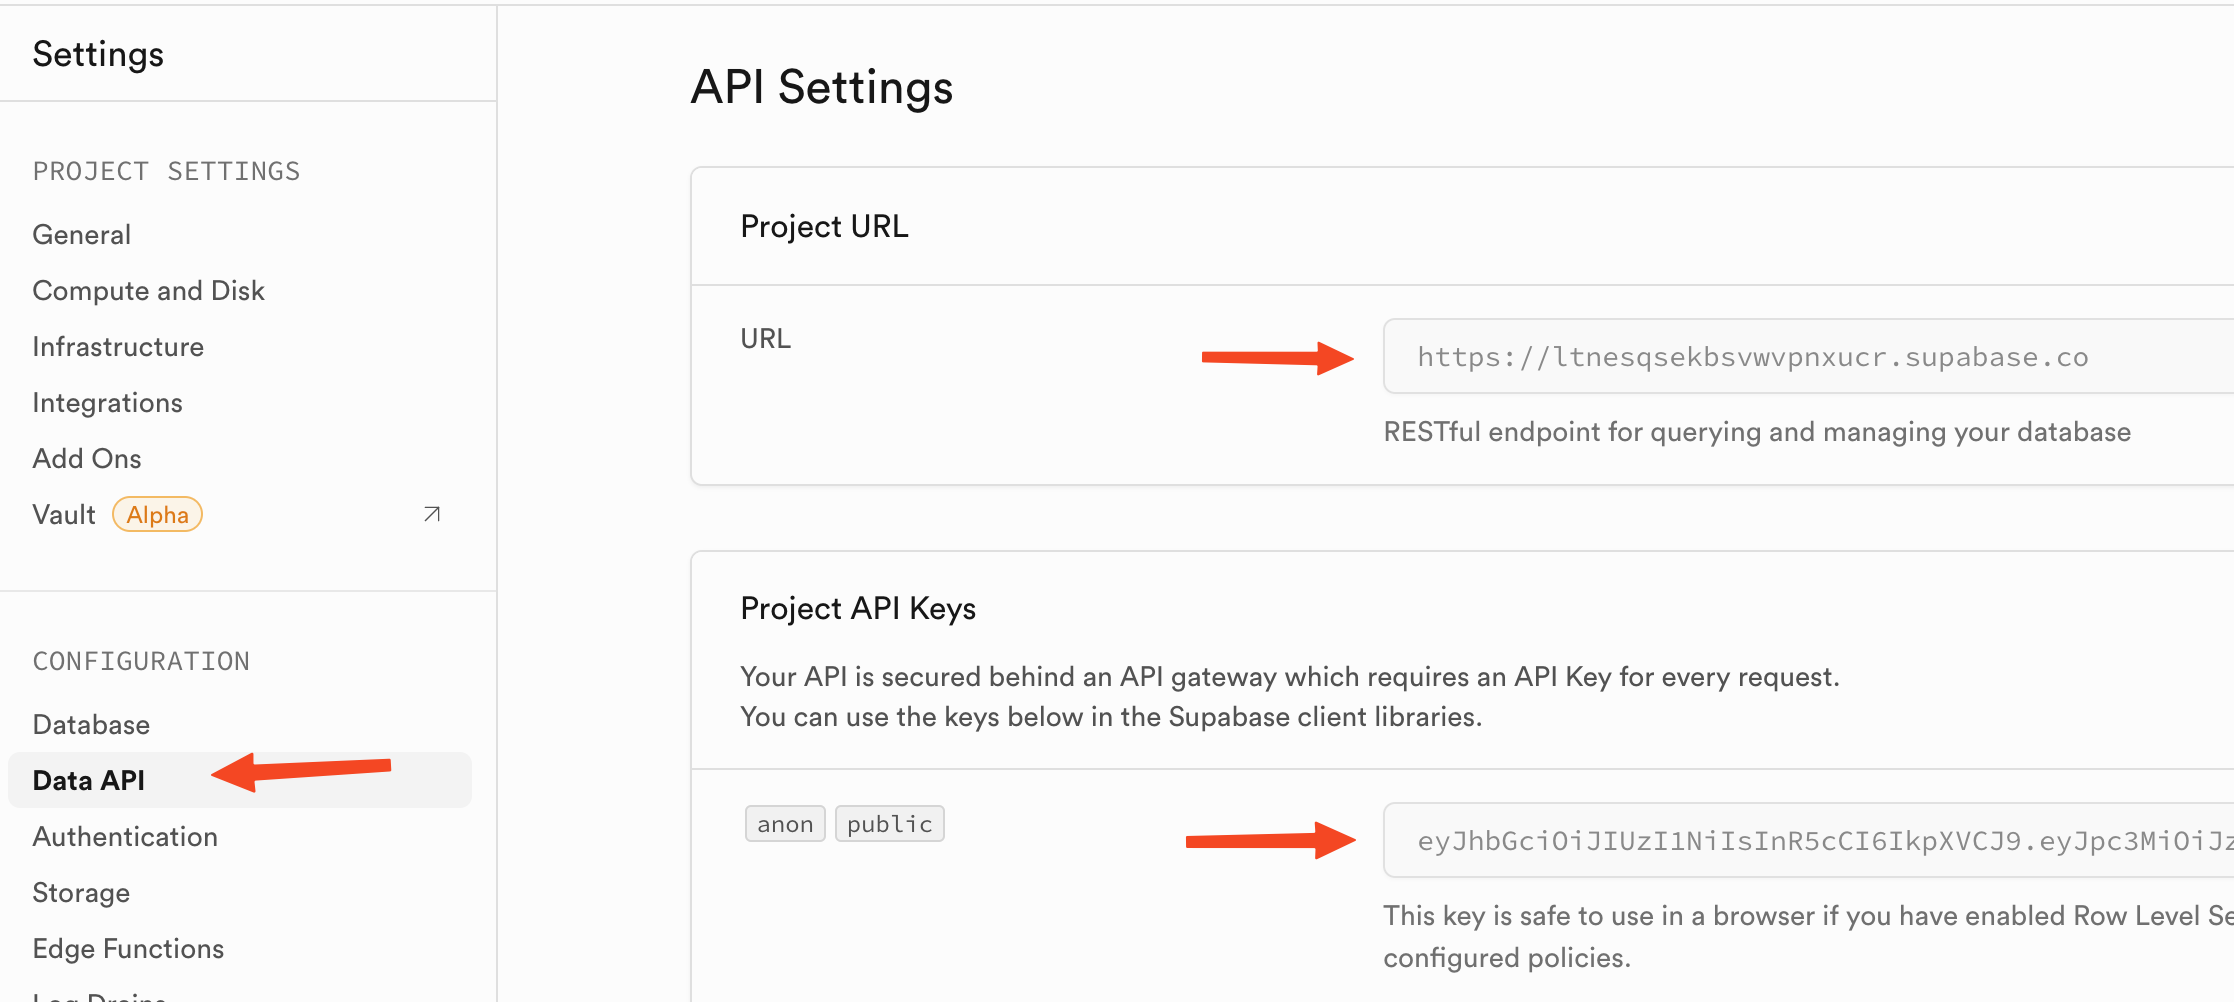
We need to create the environment variables (remember the import.meta.env portions in our code), simply create the /app/.env.local file. These variables can be found in the supabase Data API settings page:
/app/.env.local
VITE_BASE_URL=http://localhost:5173
VITE_SUPABASE_KEY=# The ANON key from Supabase
VITE_SUPABASE_URL=# The project URL from Supabase
As a final rundown, your application structure should now look like this:
/app
.env.local
  /src
  App.tsx
  main.tsx
    /components
      DebugComponent.tsx
      LoginComponent.tsx
    /pages
      Home.tsx
      LoggedIn.tsx
Fire up the application with the `pnpm run dev` and you should now be able to log in!
If the login process lands you on a 404 page, look at the url and verify that it's redirecting you to the local app properly. If it isn't check the Supabase URLs and change the "localhost" fallback to the proper location.
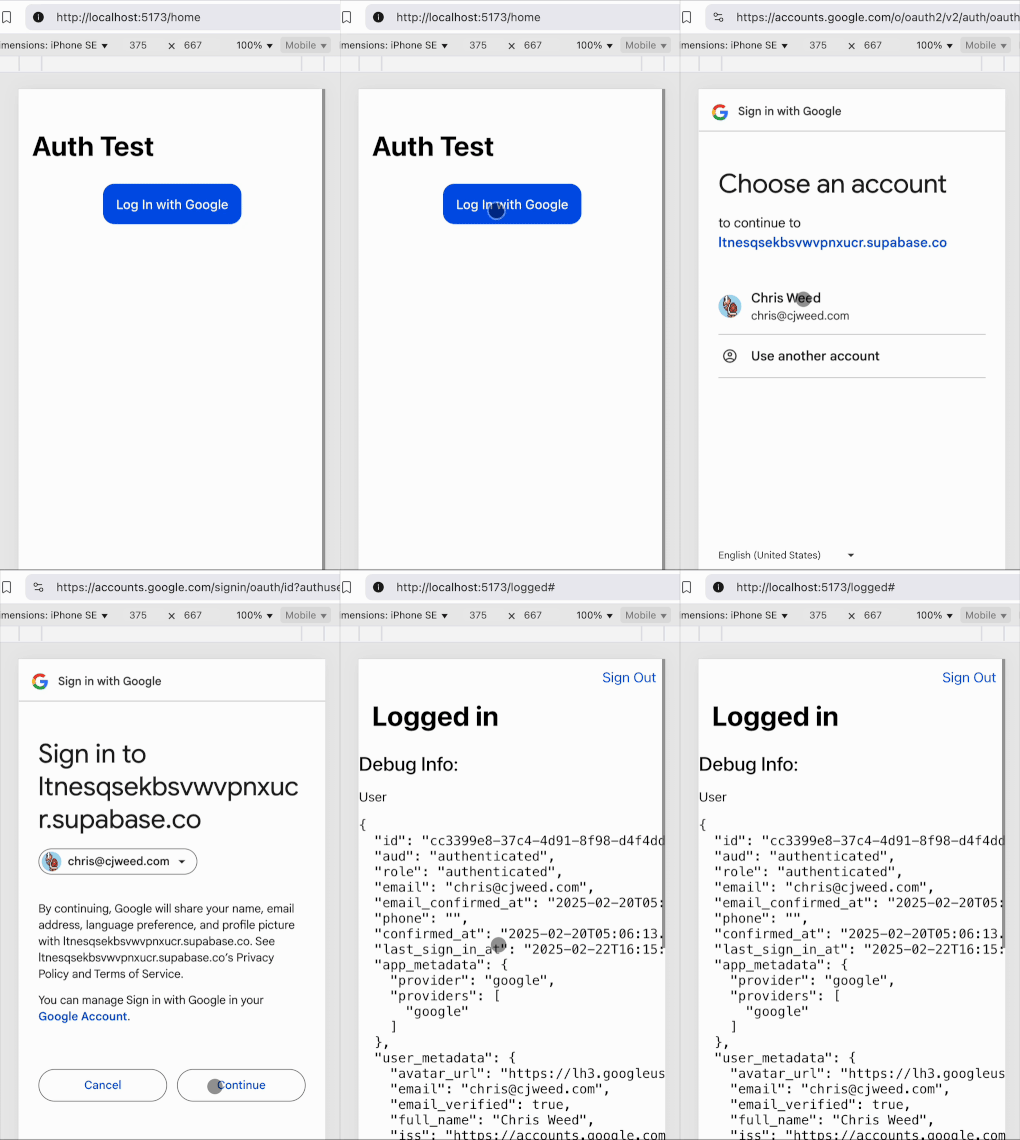
Before we move on let's kill the server by `cmd-c` in the terminal. This will end the local server and free us up a little bit for the next steps.
Setting Up Capacitor
First off we need to get Capacitor setup for iOS and all the environment settings. We will be following the instructions here: https://capacitorjs.com/docs/getting-started/environment-setup
Since we will be building an iOS app I'll be focusing on getting that half setup. Adding Android isn't so bad and may be the topic for a future tutorial.
To build an iOS app you unfortunately need an Apple Developer account which costs $99/year! It seriously took me about 8 years to really push myself over that cliff but it's a great way to inspire getting an app built and into the store. You can sign up for an account here: https://developer.apple.com/account
Once you have an account created, download and install Xcode: https://developer.apple.com/download/applications/
After installing Xcode, let's not open it yet and instead dive back to our app code. First we will install Capacitor in our app:
pnpm i @capacitor/core @capacitor/ios
pnpm i -D @capacitor/cli
With that we need to initialize Capacitor, this will create a couple files we need that helps build the project files for iOS:
pnpm exec cap initBefore we add some of the iOS specific items we need to setup the Capacitor config file:
app/capacitor.config.ts
import type { CapacitorConfig } from '@capacitor/cli'

const config: CapacitorConfig = {
  appId: 'zone.wtft',
  appName: 'WTFT Zone',
  webDir: 'dist',
}

export default config
Most of that file may be the same as what's there already but you'll want to modify the appId and appName.
Now we can finally add the Capacitor iOS capabilities:
pnpm i @capacitor/ios
Then run the build on the application to make it create the `/dist` folder:
pnpm run buildWith the latest Capacitor there's an option to use the official Swift Package Manager vs Cocoapods. As of this writing it's still experimental but since there's not an obvious way to convert applications (yet) and we aren't using any 3rd party plugins we can confidently use this today. If you are using 3rd party plugins or have other oddities you might add in the future you may want to stick to Cocoapods for now.
pnpm exec cap add ios --packagemanager SPMOne last step before we open Xcode is to build and sync our application. This build and sync is something you'll have to do quite often because any changes to your application need to be bundled up and then placed into the native app. Get used to this command (you could even create a custom script in the package.json to make this easier/shorter):
pnpm run build && pnpm exec cap syncAnd now we can finally open Xcode with our nice project:
pnpm exec cap open iosThat command will open Xcode with your workspace file. You don't always have to use that to open it, in the future you can simply just open Xcode and the workspace folder manually (or in the previously opened workspaces).
To run our application in a simulator click the dropdown and pick iPhone SE. Why? Well when I'm developing mobile/web apps I find that it's always best to run it on the slowest/oldest hardware that you officially support. This will help expose any performance or design issues you may have right away (simulators have the power of your laptop so performance isn't as realistic as it would be on a real device).
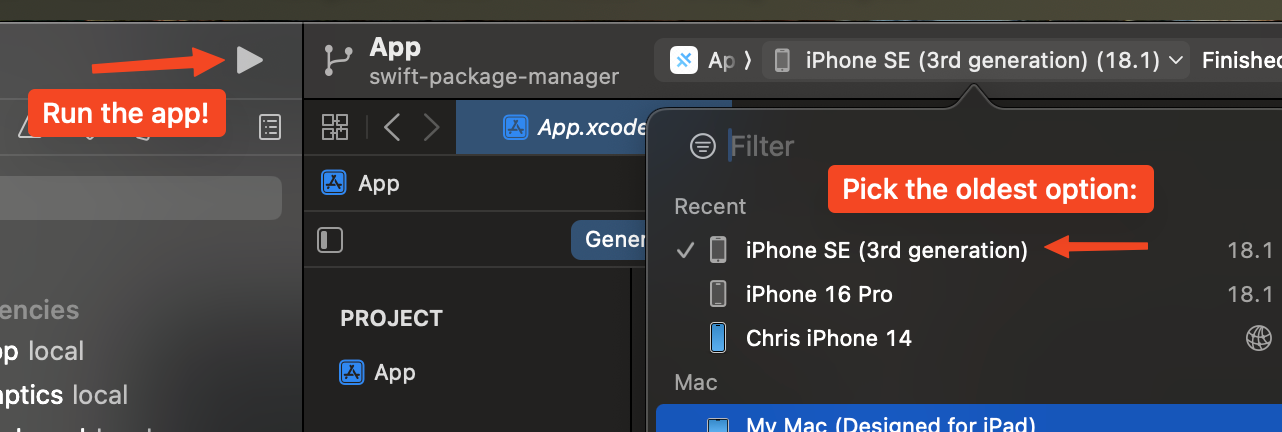
Once you've selected the simulator press the play button and watch the magic!
But wait you say. The auth is not sending me back to my own app.. it's sending me to a broken localhost page! Yes that's correct, remember we killed our local server but also even if it was running we'd simply land on that page.
Give it a try once, fire up the local server again:
pnpm run devAnd then try to authenticate with the simulator again. You'll land on the logged page for that website, not back in your native app 😔. This is where Deep Links or as Apple calls them "Universal Links" comes into play.

Deep Links and Universal Links
Deep Links allow you to have a simple url that opens up a native app if it's installed or just the website. Deep Links provide a great security measure compared to old app-like domains since there's a verification step to claim the domain and prove that it's yours. A good portion of this follows the Capacitor tutorial: https://capacitorjs.com/docs/guides/deep-links
We will use Deep Links (or Universal Links as Apple likes to call them) to our app to allow the redirect that we get from the Google Authentication flow to open our app. This is a little complicated due to those security measures but worth it!
Deep links do NOT work for every browser! If you are using Orion, Brave or other "off-brand" browsers the Deep Links may not actually open the native app. For this reason I half-feel this authentication procedure is not entirely the best but it's good for simple apps. Please be aware of this if you are building a production level app!
Even if you don't use Deep Links for authentication in the future it's still good to have for your application for general use. So these steps aren't wasted if you move to a more robust authentication procedure.
Universal Links (I'll just use that term from now on) require the use of a special file on a website to allow Apple to validate that you own the domain. So first we need to build a website! We will use Github Pages for this purpose. If you want an example app to look at you can see it at my repo: https://github.com/Kikketer/wtftzone/tree/main/packages/website
You will need to have a custom domain for this procedure to work. I've tried with just the <username>.github.io and it seems to cause issues for many users. It's best to just suck it up and get a cheap domain on Porkbun: https://porkbun.com/tld/click
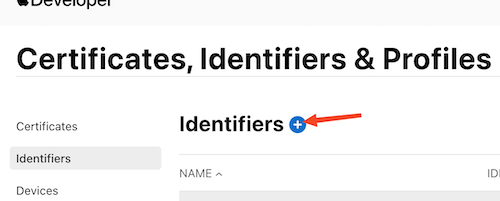
Before we go build a website we will tell Apple that we have an "Identifier" that our iOS app will use to link a domain to the app. Navigate to https://developer.apple.com/account/resources/identifiers/list
Click the "+" icon:
Select "App ID" and "App" type and then fill in the domain you've purchased but in reverse. This is an App ID that is used to uniquely identify your app (behind the scenes) in the Apple App Store and what we will use in Xcode to identify the app. A backwards url is typically how this is done.
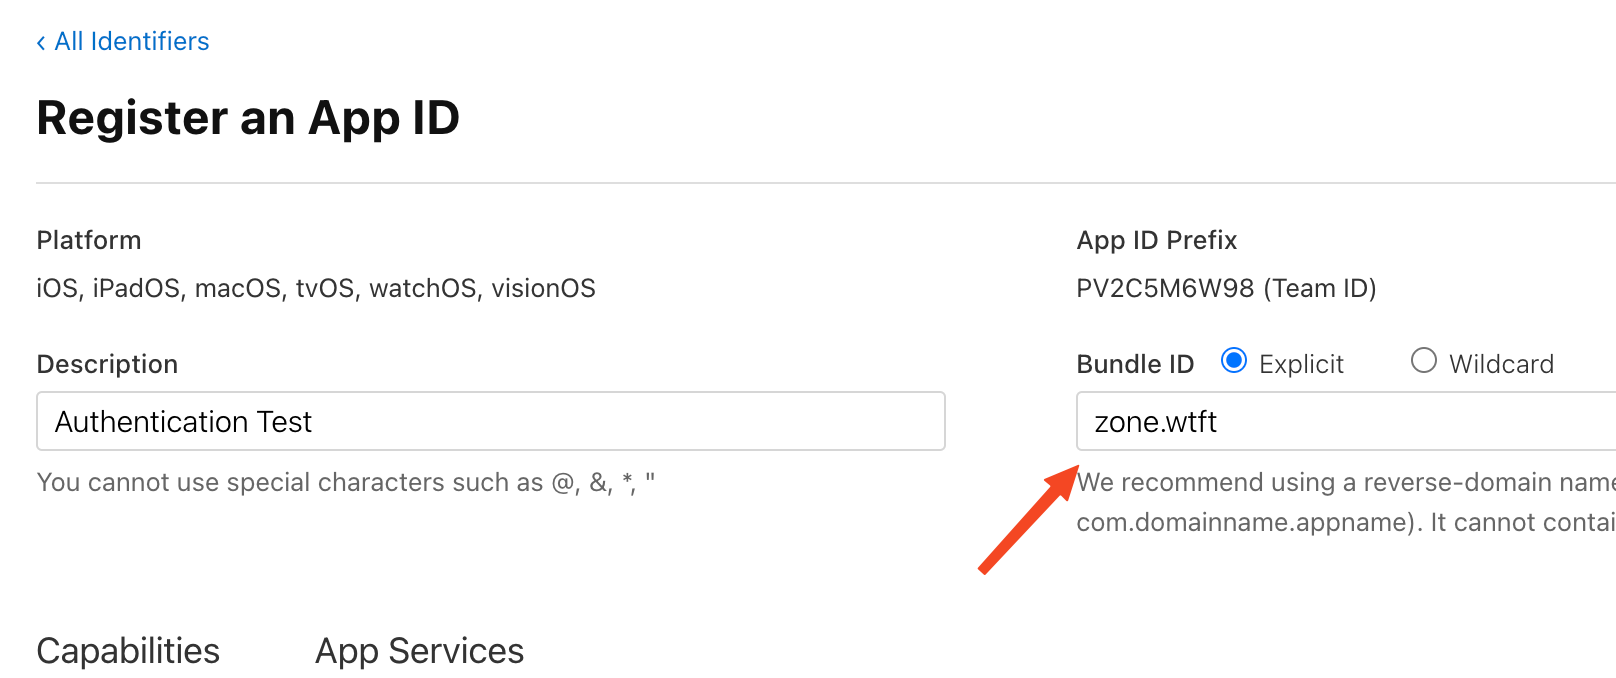
Now scroll down that page, we will want to enable "Associated Domains" to allow our app to associate itself with the domain we've purchased (the actual domain that it'll attempt to attach to will be updated in Xcode):
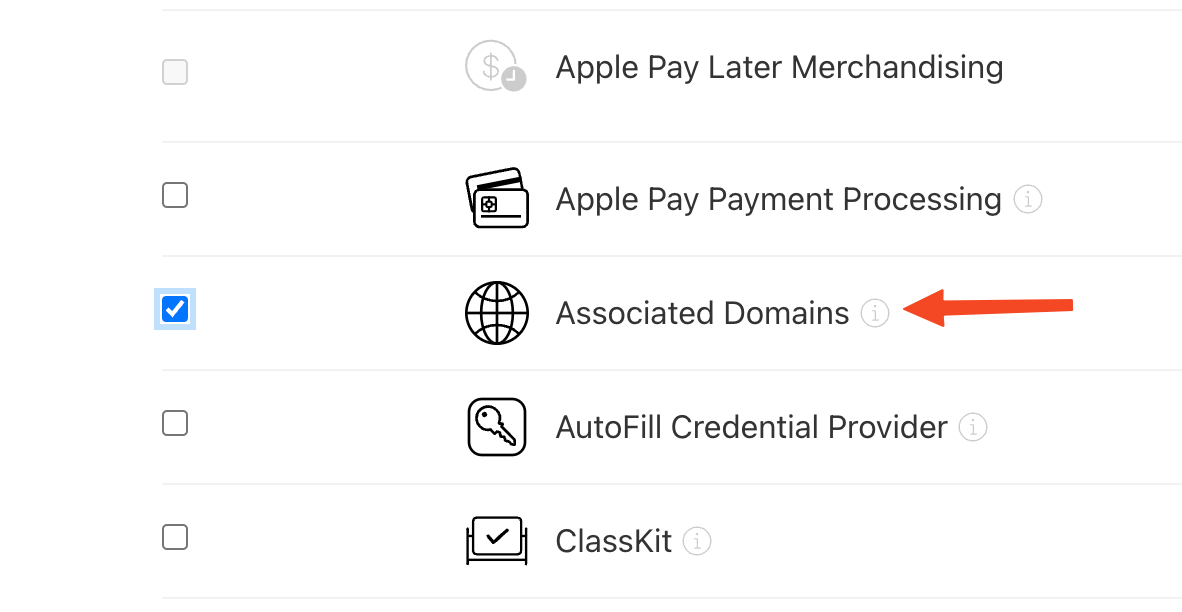
Ok phew, now we are finally ready to build a bare-minimum website that will host up a special file so that Apple knows that you own that domain and any links to that domain should open your app.
Create the Website
Creating a static site on Github is pretty simple, their documentation can be a little confusing but we will be following these steps mostly: https://docs.github.com/en/pages/getting-started-with-github-pages/creating-a-github-pages-site
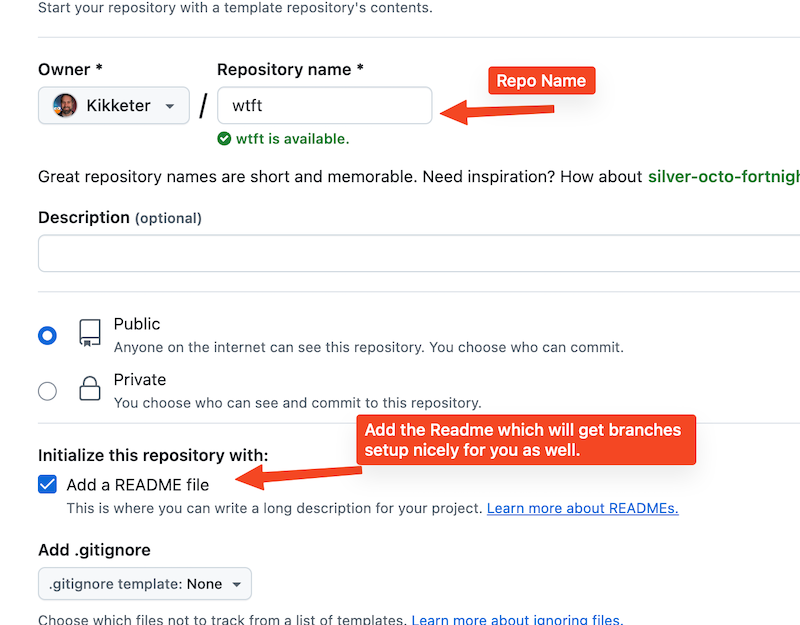
First let's create a new Github repository. I'm assuming you've created one of these before, if not their signup process is pretty straight forward.
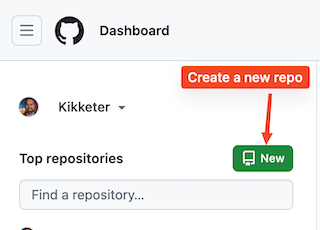
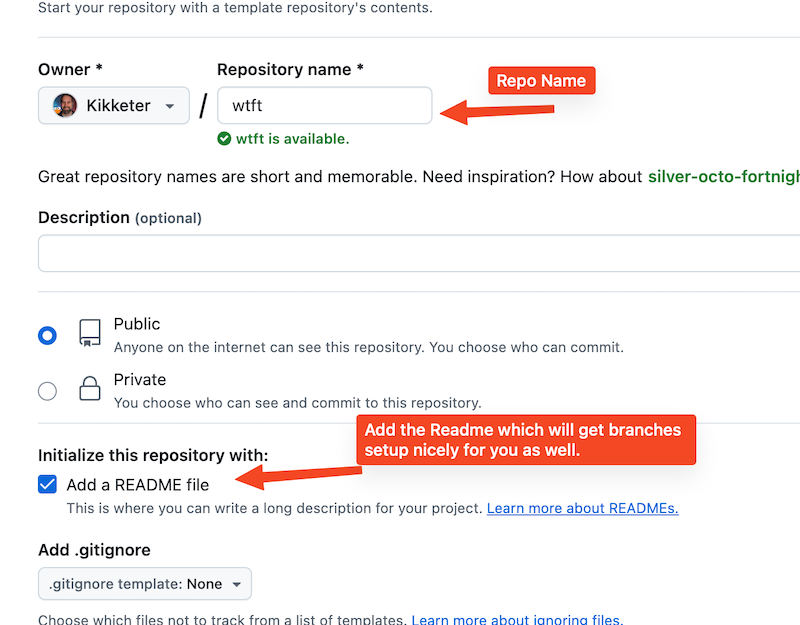
The next screen you can fill in your repo name and create the README file. Having the file created here makes editing the repo just by using the browser nice and simple.
After this step you will be presented with a pretty blank repo. Let's create a new file:
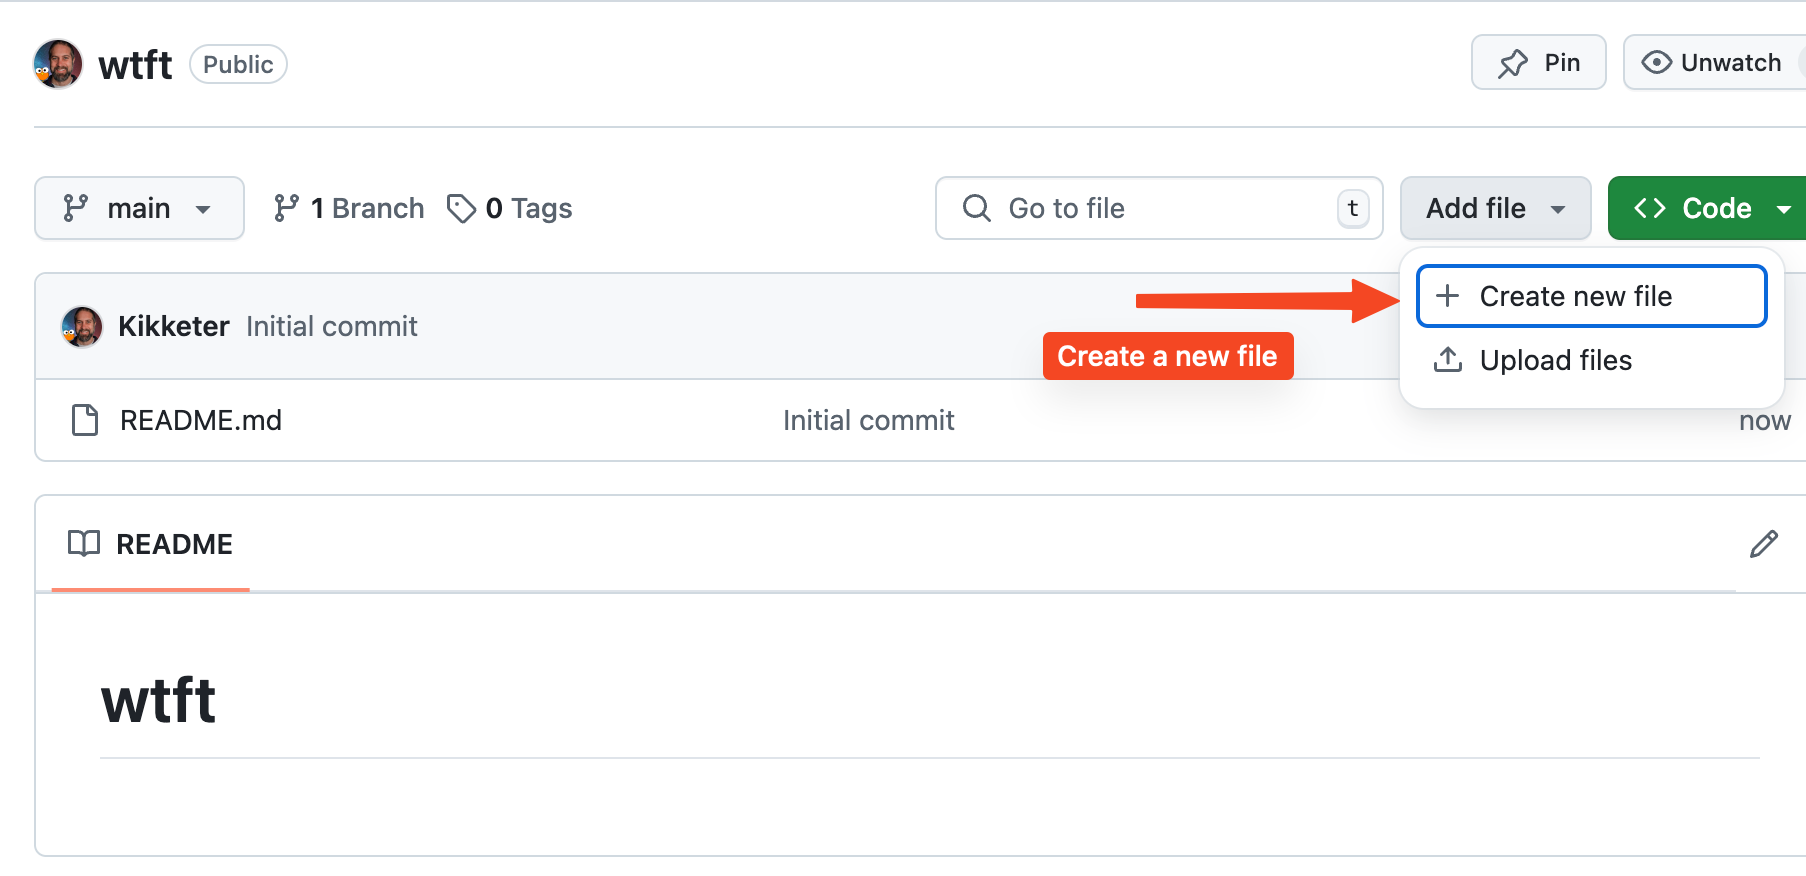
We will then create the `.well-known/apple-app-site-association` file:
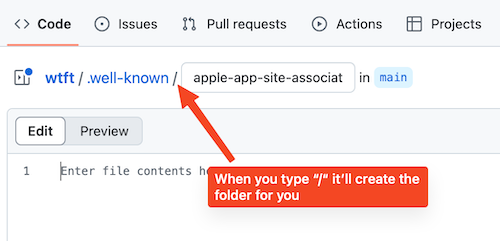
Then we will paste in the following:
{
  "applinks": {
    "apps": [],
    "details": [
      {
        "appID": "<app id>.<domain>",
        "paths": [
          "*"
        ]
      }
    ]
  }
}
You will need to change the appID to be what your site is. The app id comes from the Apple App we created earlier:
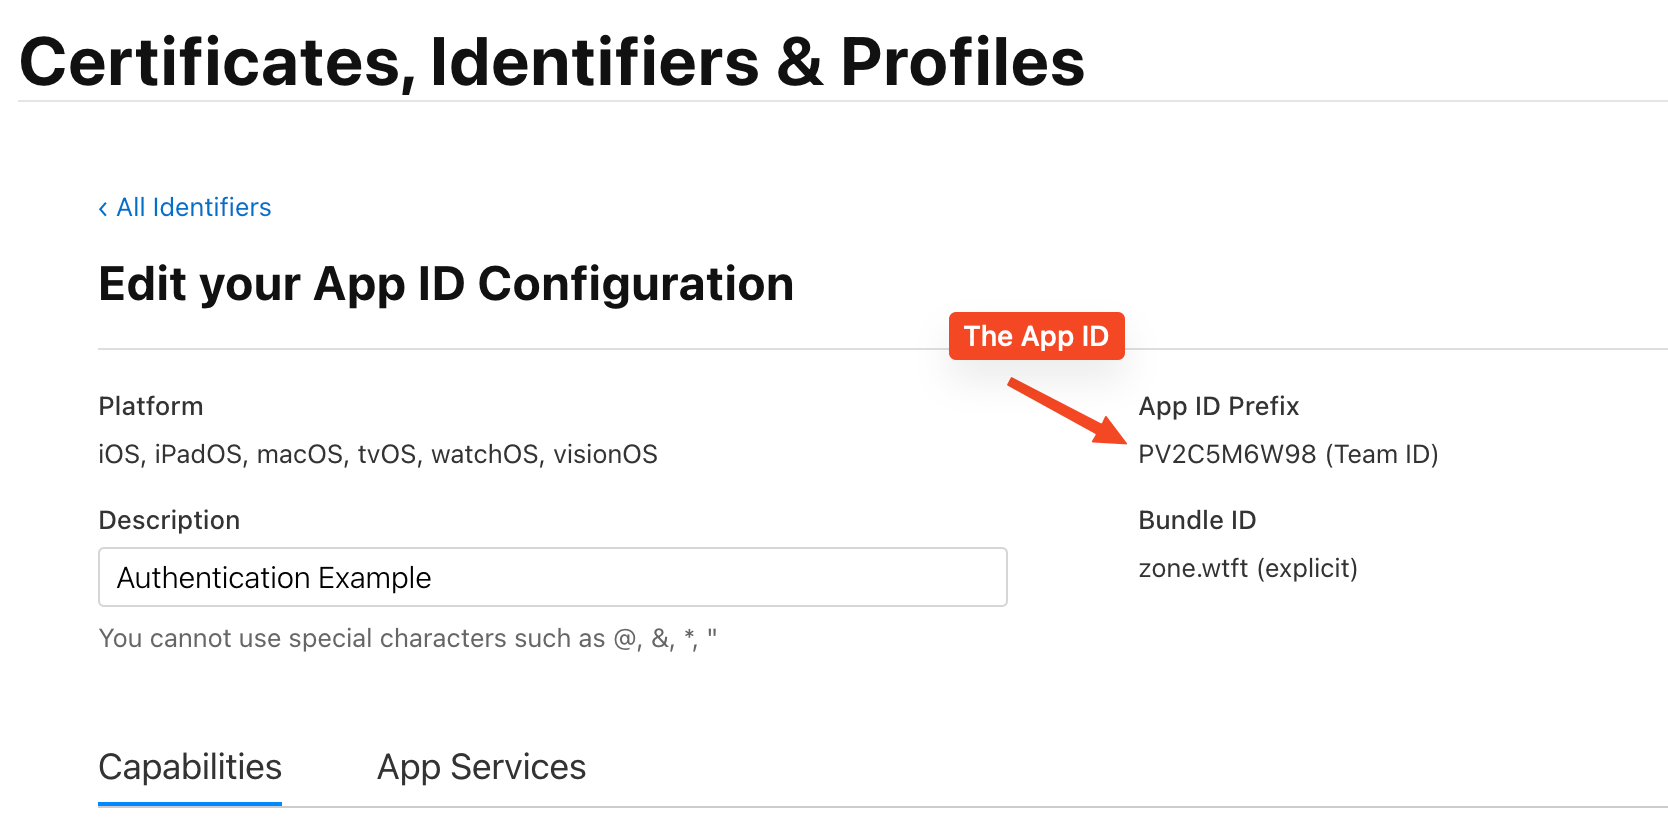
The resulting item should look something like:
"appID": "PV2C5M6W98.wtft.zone",We need to create one more file in our repo so that we can tie our repo to the real domain we've purchased. Create a "CNAME" file (no extension):
CNAME
wtft.zoneThis gives Github the information it needs to tie your purchased domain to this site and that it should be used in this repo. Before we are through here though let's make a very basic html page so we know the site is working:
index.html
<head>
  <title>Basic Site</title>
</head>
<body>
  <p>Yay!</p>
</body>
Your resulting repository should look something like this:
.well-known/
  apple-app-site-association
CNAME
index.html
Next we need to verify with Github that we own the custom domain. So head over to the global Settings > Pages: https://github.com/settings/pages within Github.
Click "Add Domain" and enter your domain
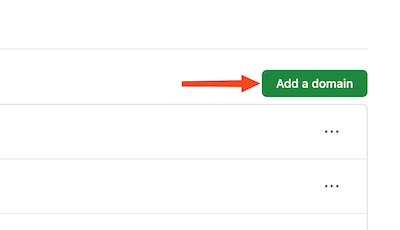
Github will then give you instructions on what records to add to your domain register. I'm using Porkbun but yours may look different than this but the IP addresses, CNAME and TXT entries would look similar:
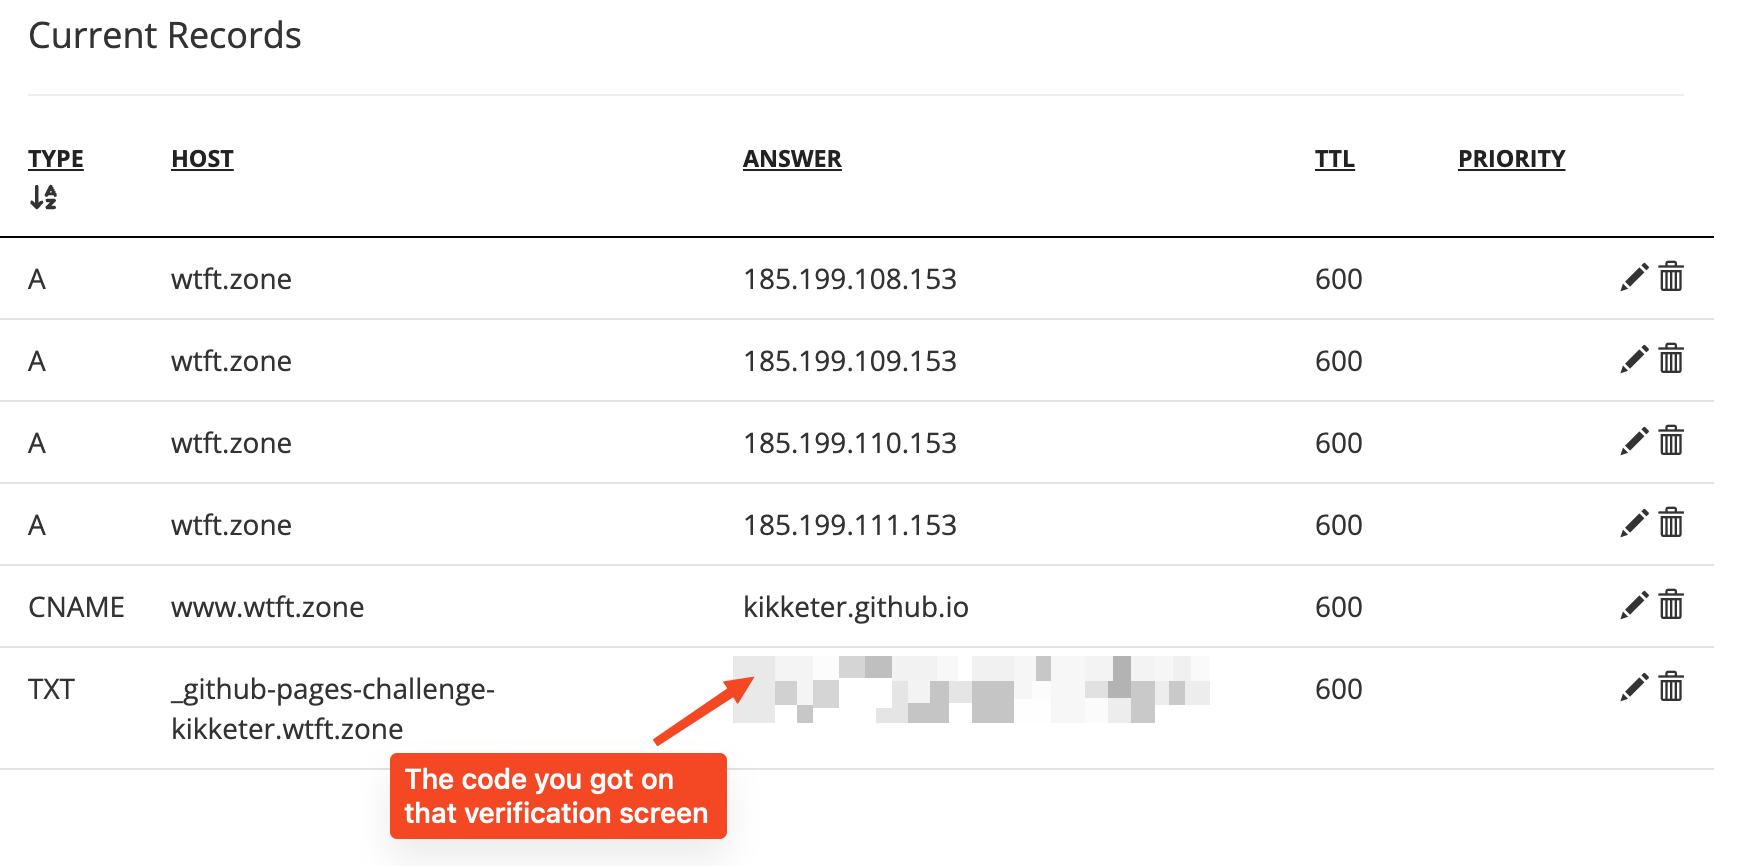
The IPs that you want your A type in the domain would be these (mostly here so you can copy/paste):
185.199.108.153
185.199.109.153
185.199.110.153
185.199.111.153
Back in Github you should pretty quickly see that it's able to verify your domain:

This means you can now use this domain in our repository, so lets head back to the repo and go to Settings > Pages within that specific repository. You can now enter in the custom domain we've verified.
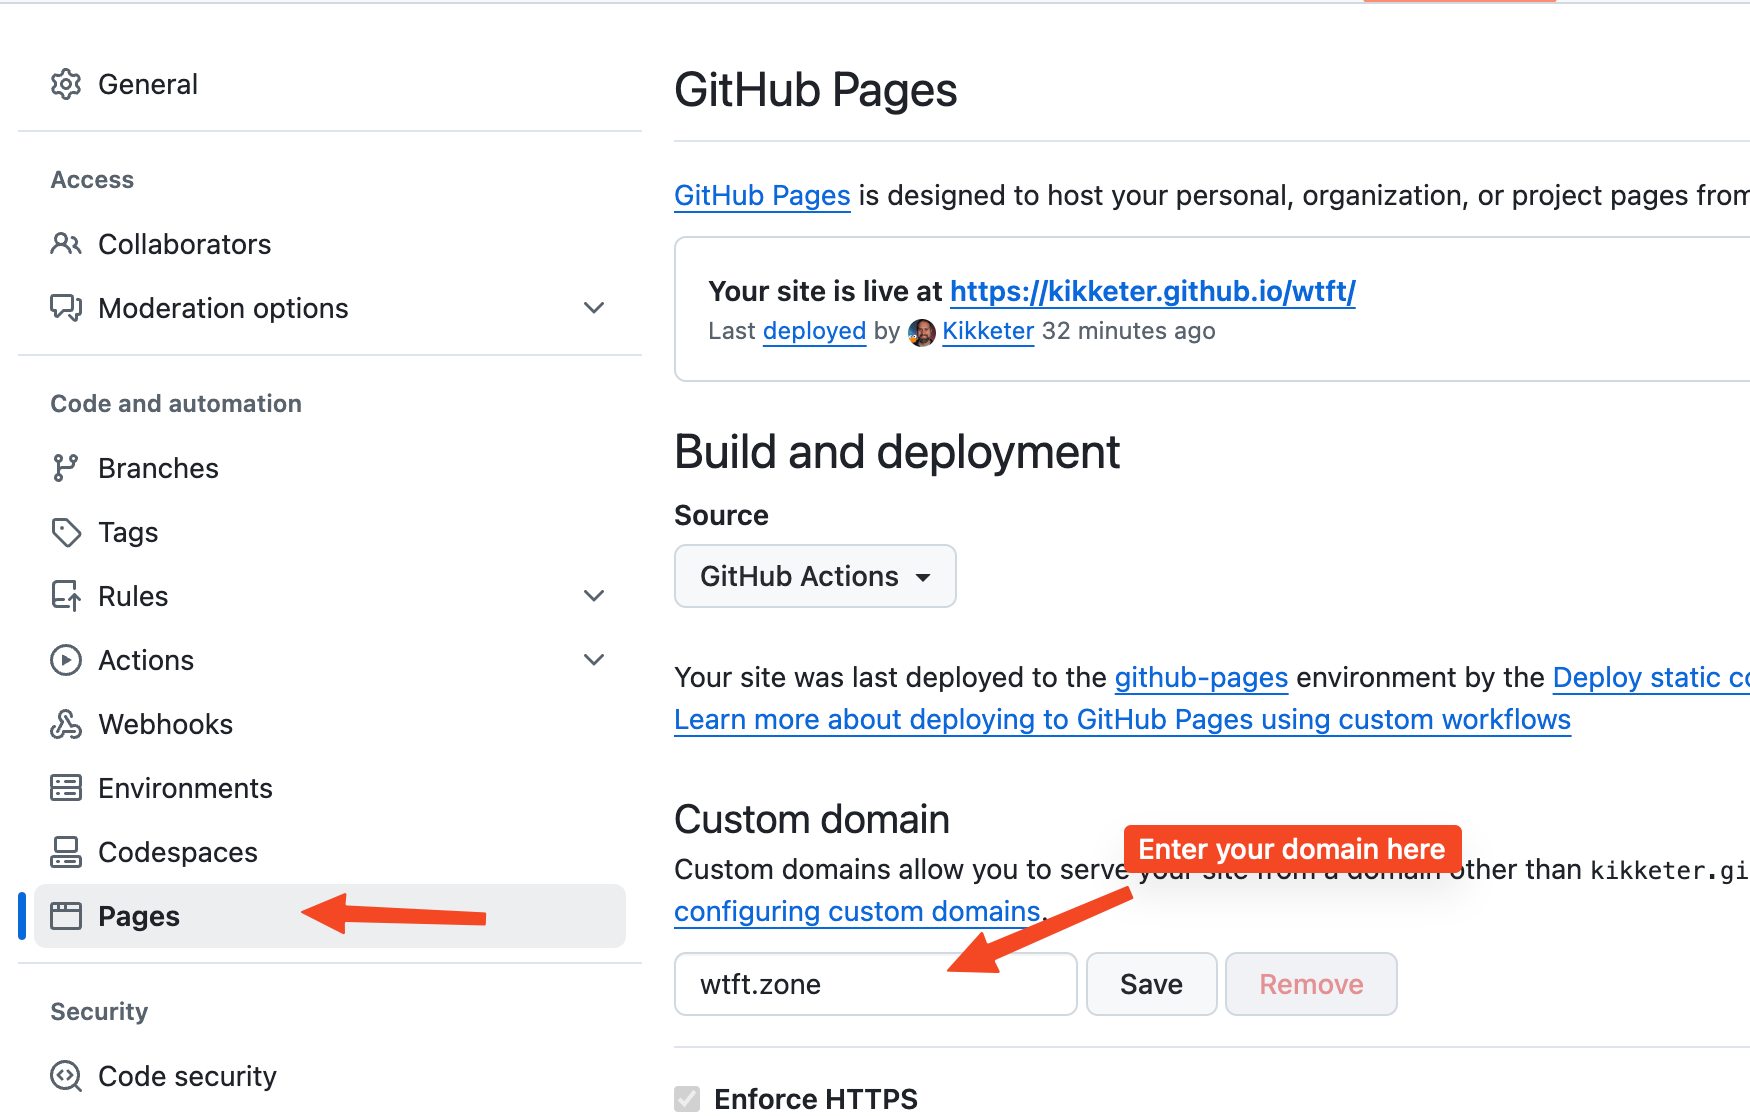
Hopefully quickly it'll verify your domain. However the HTTPS portion of the domain won't be instant. This may take up to a day so this is a great opportunity to get up and stretch your legs (same for me).
Once it's verified you should be able to navigate to your domain and see that boring html page we created! Even better test is to navigate to the `.well-known/apple-app-site-association` location where it'll attempt to download the file. That means we are good to go with linking our app to this domain!
Associate the App
We will be following the tutorial: https://capacitorjs.com/docs/guides/deep-links
Back in Xcode we need to now leverage all of these things we've built to allow our app to use the Universal Link and domain verification we've done. Click the Targets > App and open the Signing & Capabilities tab then click + Capability:
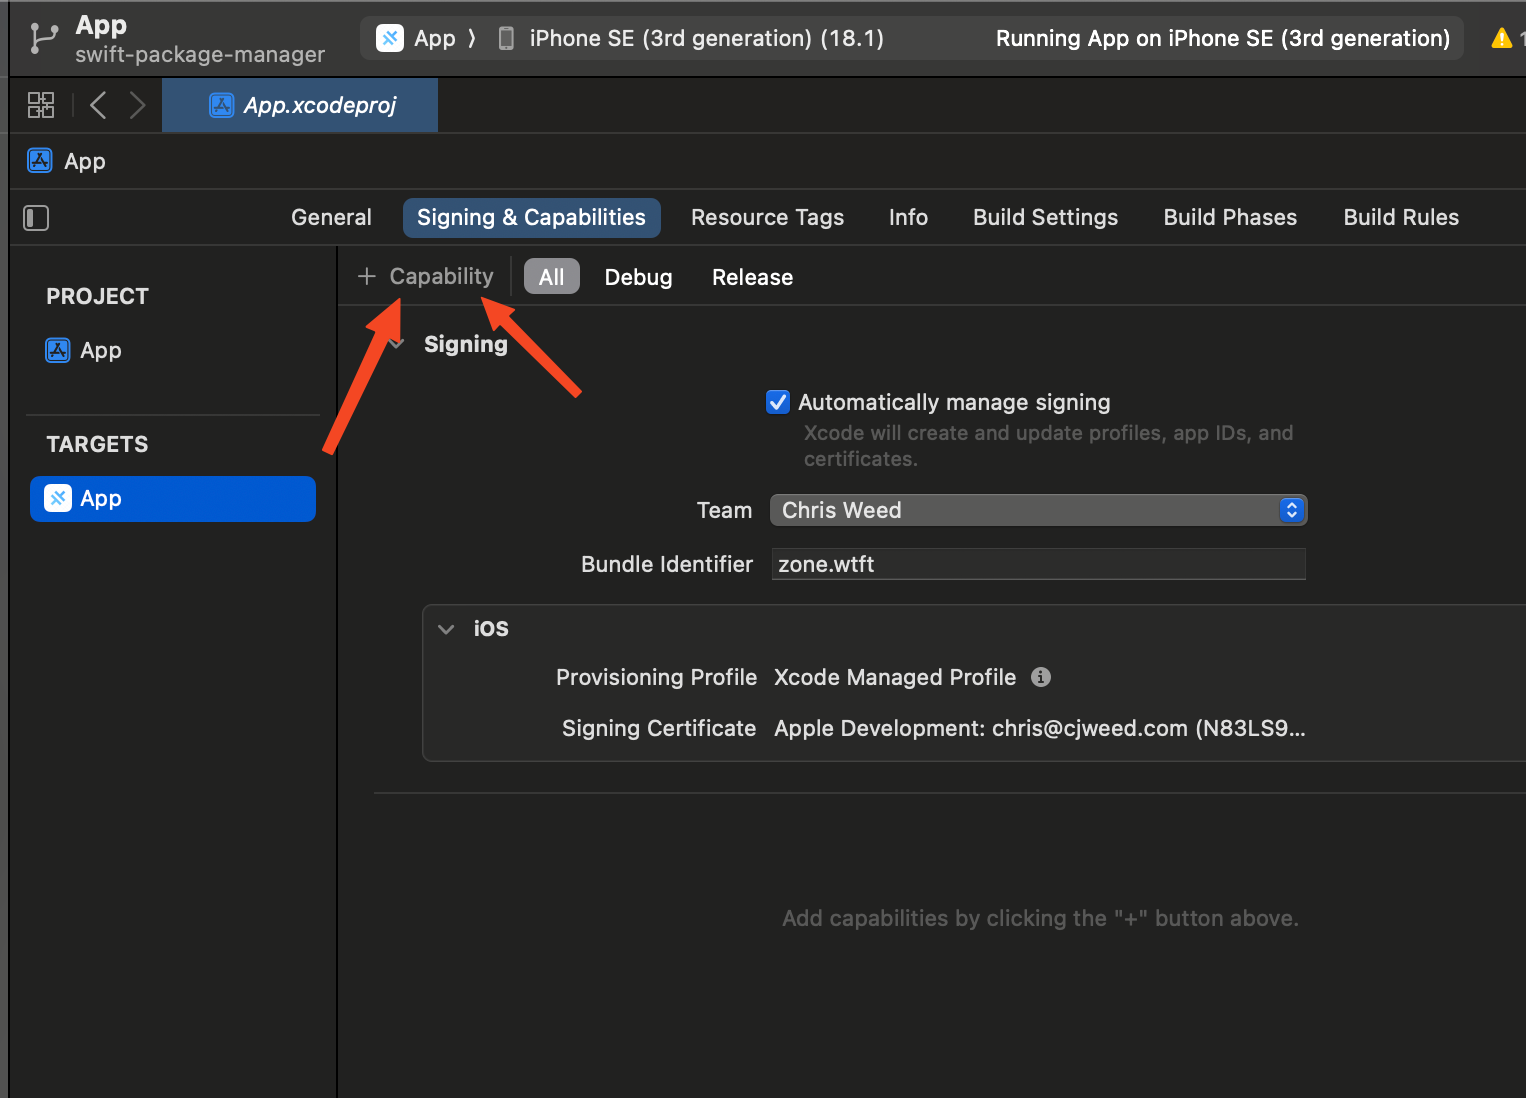
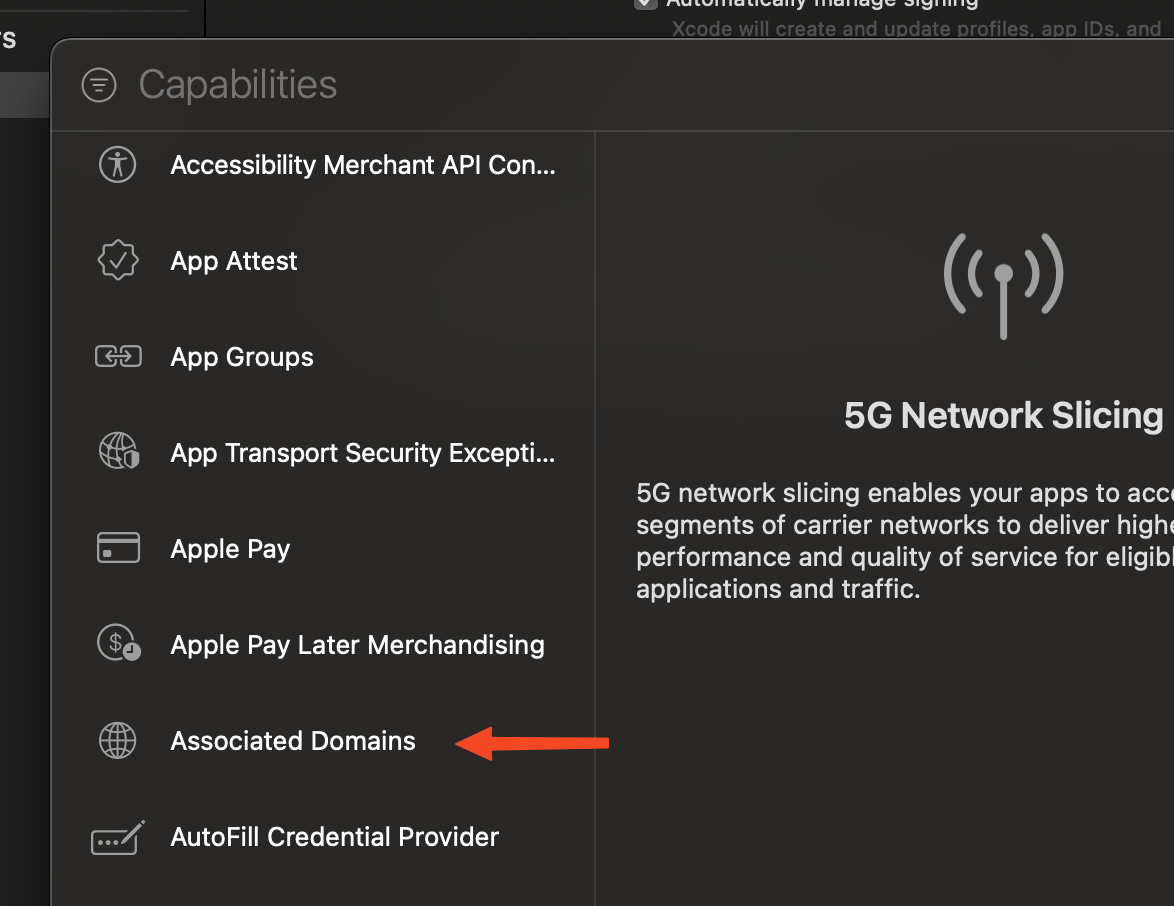
Then add the "Associated Domains" capability (does that sound familiar?):
Within the new Associated Domains section we want to create a Debug and Release version of the entries.
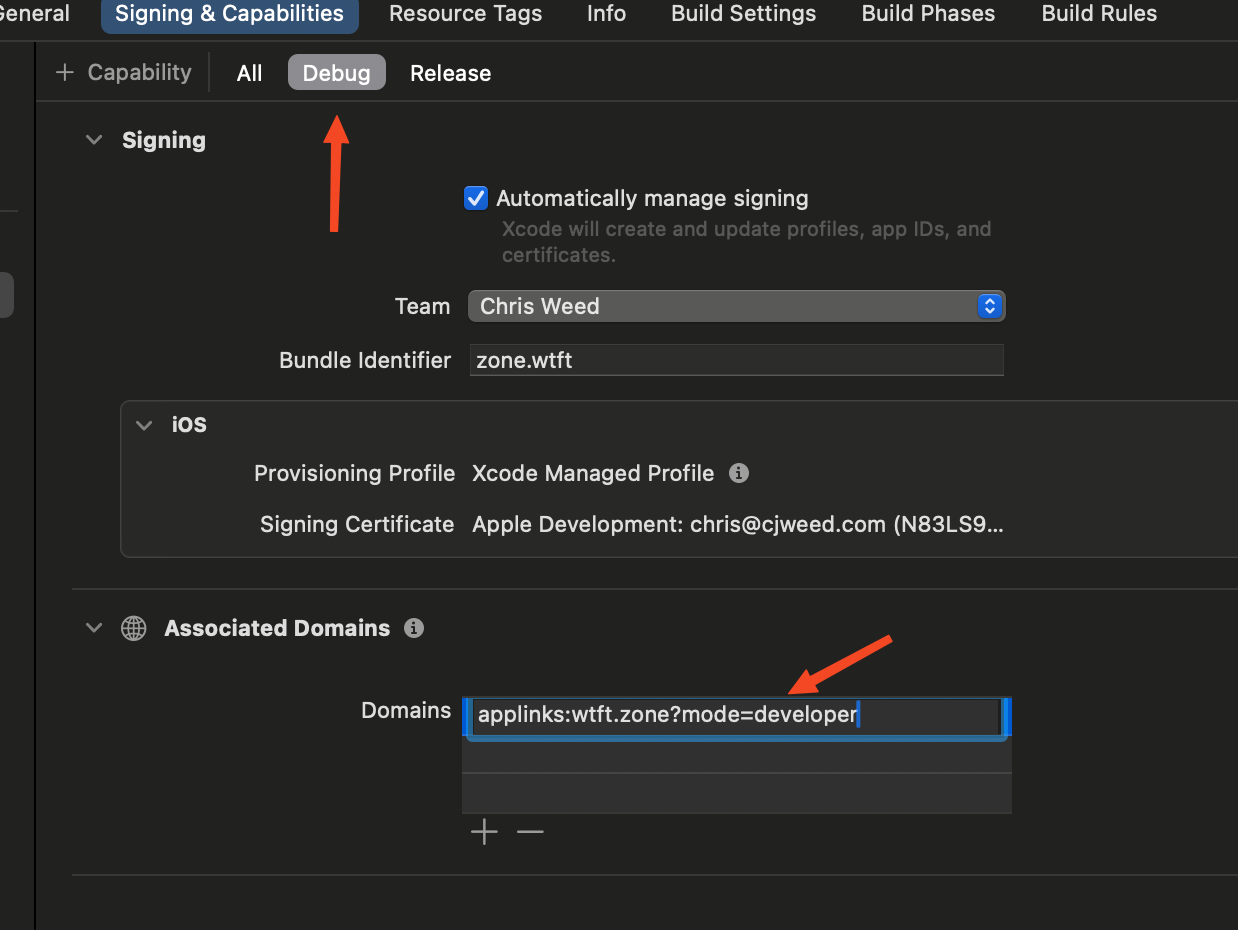
The Debug version will have the additional search parameter on it to allow us to directly check the domain for the apple-app-page-association file vs using their CDN (which can take awhile to update)
Debug:
applinks:wtft.zone?mode=developer
Release:
applinks:wtft.zone
Obviously alter those to match your domain.
Finally back in our app we want to tell it to redirect to this domain of ours when we finish authentication. Remember the original issue we had where we were being redirected to localhost, well now we want to be redirected to our custom domain.
The easiest way is to simply alter your `.env.local` file but I find that annoying when you are developing the app in the browser and the simulator. So I put a custom script in my package.json file to do the build and sync for me each time:
package.json
"sync": "VITE_BASE_URL=https://wtft.zone pnpm run build && pnpm exec cap sync",Back at our app we need to actually handle this Universal/Deep Link as well. Capacitor gives us a hook to be able to listen to the event that the native app was launched via a Deep Link.
Create a component called DeepLinkHandler.tsx:
components/DeepLinkHandler.tsx
// https://capacitorjs.com/docs/guides/deep-links#react
import { useEffect } from 'react'
import { useHistory } from 'react-router-dom'
import { App, URLOpenListenerEvent } from '@capacitor/app'
import { useSupabase } from './SupabaseProvider'

export const DeepLinkHandler = () => {
  let history = useHistory()
  const { supabase } = useSupabase()

  useEffect(() => {
    App.addListener('appUrlOpen', (_event: URLOpenListenerEvent) => {
      // We get the access_token and potentially the refresh_token from the url:
      const url = new URL(_event.url)
      const params: Record<string, string> | undefined = url.hash
        ?.substring(1)
        ?.split('&')
        ?.reduce((acc: Record<string, string>, s) => {
          acc[s.split('=')[0]] = s.split('=')[1]
          return acc
        }, {})

      const access_token = params?.['access_token'] ?? ''
      const refresh_token = params?.['refresh_token'] ?? ''

      // Only sign in if we got an accessToken with this request
      if (access_token) {
        supabase.auth.setSession({ access_token, refresh_token })
      }

      // Dive deep into the app if we have a specific place we were told to go:
      const slug = url.pathname
      history.push(slug)
    })
  }, [])

  return null
}
This code will add the listener for the deep links within the Capacitor app and place the resulting auth tokens to set the session. Once this is set in Supabase we are officially authenticated to Supabase!
Your app structure should now look like this:
/app
.env.local
  /src
  App.tsx
  main.tsx
    /components
      DeepLinkHandler.tsx
      DebugComponent.tsx
      LoginComponent.tsx
    /pages
      Home.tsx
      LoggedIn.tsx
We just need to add this to the App file so that it runs when the application starts up:
App.tsx
///... previous code
const App: React.FC = () => (
  <IonApp>
    <SupabaseProvider>
      <IonReactRouter>
        <DeepLinkHandler /> << Adding this within the Router
        <IonRouterOutlet>
          <Route exact path="/home">
            <Home />
          </Route>
/// ... previous code
After this addition we can build and sync the application `pnpm run sync` which will set the environment variable for the base url, build the application then sync it to the native app. Then all you need to do is re-run the native app in Xcode.
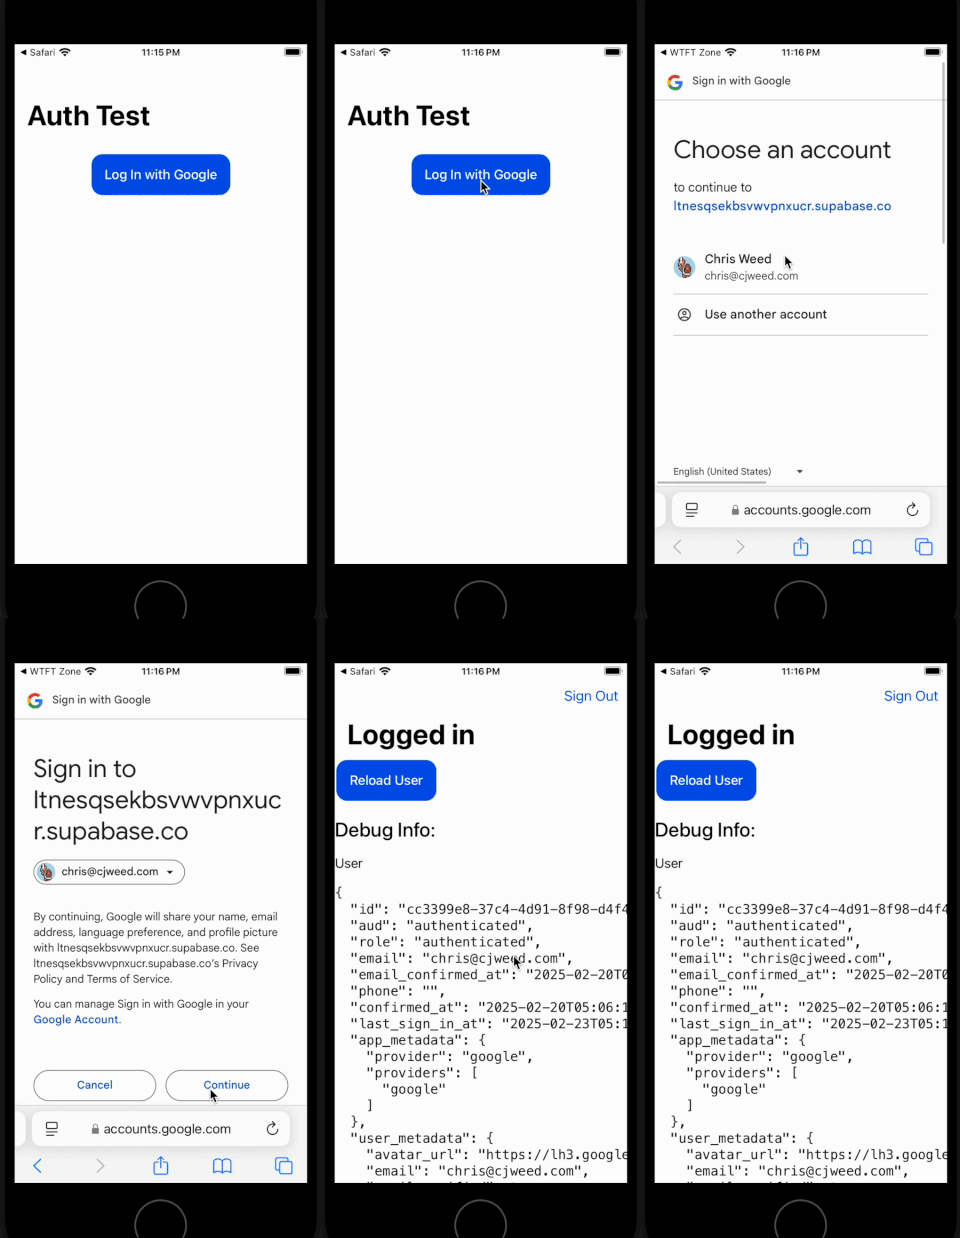
Did you see that? The native app was launched and we can see the user information is shown to us! We are now authenticated to Supabase via Google and can now build the rest of the app!
Holy awesome batman that was a long process but you've made it. Now time for the gotchas
Known Issues
Here are some known issues, and with these known issues I'm personally doubting that this is a production ready procedure. But with the goal of "no extra code for native app" and "simple side-projects" this seems to work fairly well. If anything it gets you into a good position to do the extra steps of native-specific authentication.
Here's a list of things I've come across so far, this list may grow/shrink as I adjust and learn:
- There are some browsers that will not launch the native apps using Universal Links. Orion and Brave are two that I know of. That should/would account for a tiny percentage of the population but it's difficult/tricky to know if the user is unable to use your native app because they will simply land on a working page on the web instead of the app.
- This only works with the "prompt: 'confirm'" option in the Google provider options. It appears that Universal Links do not trigger and load the native app if it's from a redirect. So the extra step process of the confirm windows in the browser allow the Universal Link to work properly.
Next Steps
With the known issues of the different browsers I'm expanding this tutorial to handle the in-app browser experience. This update will require some changes to the code that handle some native-device specifics. The goal of this post was to see how we can add auth without making any specific changes like that.
I would recommend looking at the next post to add the in-app browser experience if you plan to make any of these things production ready. The in-app experience is more inline with the typical process of a true native app and guarantees that the redirect works since it's using the internal browser (Safari in this case).
Using the In-App Browser for Authentication
Credits and References
- Ionic Docs: https://ionicframework.com/docs/
- Capacitor Docs: https://capacitorjs.com/docs/
- Supabase Docs: https://supabase.com/docs/guides/getting-started/quickstarts/reactjs
- Capacitor + Android Inspiration: https://forum.ionicframework.com/t/setting-up-supabase-google-oauth-with-capacitor-android/234165